Comment

Ask the Alchemist #109

You said you should roast criollo delicately but you also say in some of your reviews for criollo beans that they should be roasted fully. Isn’t that a contradiction?

Thanks for the question. That is a great follow up to last week’s question. To answer your question, no, it’s not a contradiction. You knew I would say that of course. So, why isn’t it? That’s what we are going to talk about.

It’s really that we are talking about TWO different things. How the heat is applied (delicately/aggressively) and how much you roast the beans (light/dark). As soon as you grasp we are talking about two things, and that they are not related, the apparent contradiction disappears.

To give an example that you are probably more familiar with, think about the two extremes of the slow simmer/braise of a piece of meat vs tossing it on a hot grill. The braise is cooking it delicately. The grilling is cooking it aggressively. In theory, both can be rare, medium or well done. And that is (mostly) independent of how you cook them. But that is theory.

The reality is that it is kind of hard to cook something slow and rare. You CAN do it, but I personally can’t think of a single time in cooking that I would want to. Every instance I can think it could be applied (rare gentle cook hamburger, rare braised steak, barely sautéed onions) the result usually isn’t termed ‘rare’. It’s under done and lacking in flavor. Every single one of those would do so much better cooked aggressively for a short amount of time. Seared hamburger. Blackened steak. Fajita style sizzling onions! They are are all still lightly cooked, but that heat transformed them to something more instead of leaching something away. Given that, I would hold that it is a ‘rule’ in general for cooking and that would apply to ‘cooking’ cocoa beans.

In the same way different meats need different cooking methods, different cocoa beans benefit from the different roasting styles. We will disregard meats that generally should be fully cooked (pork, chicken, etc) and just take different cuts of beef as an example.

Any prime cut of meat can, and some would argue, should be cooked quickly. The goal is to cook it, but not tenderize or flavor it. It’s basically going to let the flavor shine through with the sharp heat lending a hand in alchemical transformation. This would be like a tenderloin, fillet mignon and rib eye. Basically, it does not react in a negative manner to hot fast cooking and really benefits from it. If you were to slow cook it, it might still be good, but it is going to be too tender (since it was already tender) and there is a good chance a lot of those delicate flavors are going to ‘cook out’.

On the other hand, there are meats like bottom round roasts, ‘stew meat’, brisket and flank steaks that are going to turn into shoe leather if you try to cook them fast, but a slow braise or simmer will tenderize and bring out the flavor.

And then there are those cuts that you can treat many ways. Tri-tip comes to mind. You can give it a slow medium roast, you can slice it thin and grill it or even braise it and it will come out fine (but different) for each method.

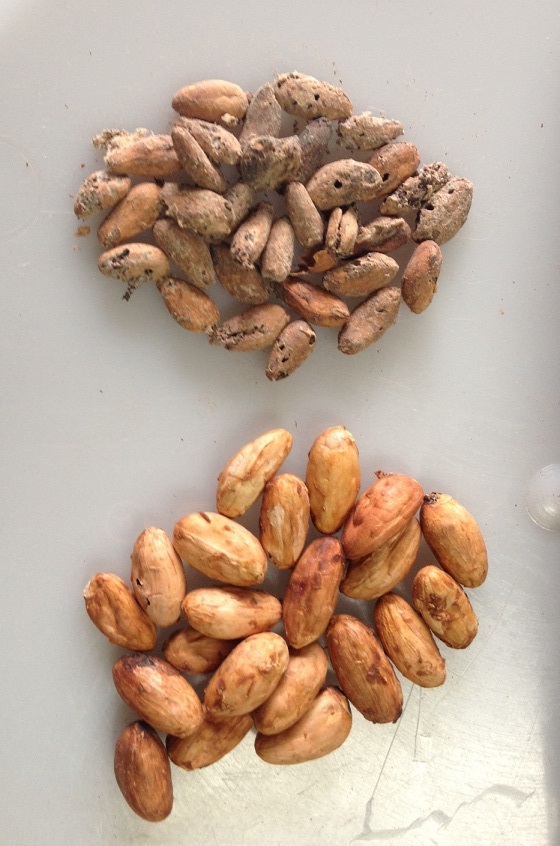
Cocoa beans are similar. Except there is a major difference. In meat, the ‘quality’ expensive cuts are cooked fast and hard and the poorer cuts are slow cooked. Do NOT think of cocoa that way in either quality nor type. Get that out of your head. Many people think of Criollo as the prized ‘quality’ bean and Forastero and the ‘other’ bean. The reason in both cases is really due to supply and demand and not because of how they are cooked. Criollo and filet mignon are both ‘rare’ and so are prized. And there is lots of Forastero and lots of stew meat per cow. It‘s that simple.

That said, over the years I have found that each type of beans benefits from a certain style of roasting. A particular profile if you will.

Forastero takes a more aggressive roast just great. And Criollo you want to treat a bit more gentle, with Trinatario bridging the gap and being the chameleon.

Now we can talk about roast lever. Light, medium or heavy. How much you cook them is dictated by personal preference. You can have a light roast, a medium roast or heavy roast. Except that you need to keep in mind the same ‘rule’ we saw above. You should not try and slow/delicately roast a bean AND try and keep it ‘rare’/light. In my experience what you end up with is analogous to crunchy warm wet onions….which I personally find rather insipid.

What if you want ‘rare’ criollo? I guess I would ask you why. If you only like rare meats, then you probably don’t want to pick a brisket that requires a long slow cook. If you do, then your options are rare and tough or fully cooked and tender. Basically I am trying to reiterate that ‘delicate’ and ‘rare’ are two different things. I would instead suggest that you want your criollo delicately roasted, but not lightly roasted.

So, to review these are the combinations I’ve found work well

Criollo, delicate to moderate heat, medium to heavy roast.

Trinatario, delicate to aggressive heat, light to heavy roast. Noting the more delicate you roast, the heavier you should roast.

Forastero, medium to aggressive roast, light to heavy roast with the same inverted caveat as the Trinatario.

Finally, one final thing I will probably touch more on later. Each type of bean’s roast level is at a different temperature, which is kind of evil. What I mean by that is light, medium and heavy are relative to each type of bean in regards to temperature.

Criollo is light somewhere around a bean temperature of 235 F and heavy around 270 F

Trinatario is light around 250 F and heavy around 285F

Forastero is light around 260 and heavy can go as hot as 310 F in some instances.

What that means is it’s difficult to say ‘take it to a medium roast’ without knowing what type of bean you are talking about. And often we don’t know the exact genetics. But it is also hard to say ‘roast to 265 F’ as many people don’t have access to set ups that allow accurate bean temperatures. Which is what makes it so challenging to teach you, my faithful reader, how to roast with words alone.

In person, light, medium and heavy roasts have pretty distinct aromas. And likewise, they have pretty distinct flavors. But they don’t translate great in words. You have to learn and experience them on your own. What that means is that you should take notes and try to apply the concepts that I’m trying to convey and keep it relative to YOUR set up.

As one very brief example, say you roast some Nicaraguan (a solid Trinatario) in the oven until you’re your IR thermometer says it’s 270 F, but the resulting chocolate is over roasted to your taste. Then you know in your system my 285 F is around your 270 F and so you should try the next roast to 255 F or 15 F lower.

Go forth and roast and eat chocolate. And don’t forget to take those notes.

I hope that clears up why delicate vs fully roasted are not contradictions.

Comment

1 Comment

Ask the Alchemist #108

How do I measure the temperature in the Behmor and match them to your temperature recommendations?

You don’t.

Caution, rambling Alchemist lecture ahead. There is no good, reliable, repeatable and consistent way to roast by any temperature measurement you can get from the Behmor. Over the years I have tried to tease out useful temperature data from the Behmor, and eventually determined that due to a host of reasons, it is not possible to get data you can actually use to roast with. Root Chocolate  ran a bunch of roasts with the Behmor 1600, took a bunch of measurements and the results look basically like what I found. Unfortunately, ‘basically’ is the key word here as they did not look exactly like mine. Nor will theirs look like yours or even their own if they change beans, weight or even ambient temperature. And that inherent variation is what makes any temperature data less than helpful.

Then what are you to do? As outlandish as it seems, what I suggest is using the Behmor as it was designed and intended. Call me crazy. The whole point of the Behmor is to give you a way to roast in a simple and repeatable manner and of course, have properly roasted beans at the end. And that is what it does. Your only need is to find the program(s) and setting(s) that work for your tastes. Notice I didn’t say ‘find the program and setting to roast properly’.

You may have noticed I don’t give many specific profile recommendations for the Behmor. The reason is they all work. All of them. I have done hundreds of roasts in the Behmor with dozens of beans and by following one set of rules, I have had 100% successful roasts. And what are those rules? It’s nothing more than I have outlined time and again.

Load: 2-2.5 lbs cocoa bean

Profile: Any

Time: 16 to maximum time

That’s it. For some reason people want more. They want me to say that they should roast 2.2 lbs of Nicaragua on P3 for 17:15 mins. Unfortunately, it doesn’t work that way because my tastes are different than yours and I don’t know what you want or if we perceive the same flavor the same way. Only you can work that out. The truth of the matter is that you can roast 2 lbs on P1 for 21 minutes (the hottest, fastest roast you can do) or 2.5 lbs on P5 for 16 minutes (the coolest, shortest roast) and both roasts (and all the ones in between) will be acceptably roasted. The key is that some may or may not be to your tastes. It’s up to you to zero in on what you like. And pretty quickly you will come to find you probably like a relatively narrow range of roast profiles, regardless of which bean you use. It’s that saving grace that will keep you from having to fine tune each and every bean.

So how do you do that? I’ll admit. I’ve be negligent here. I’m too close to it. I’ve been roasting too long. I feel into thinking that it was just an intuitive process that everyone naturally knew how to do. My apologies. Here is how to go about it without a bunch of temperature measurements and complicated plots. And it is worth noting that you can apply this iterative process to your entire chocolate making endeavor.

I want to talk a moment about what I am calling the iterative process. It’s just a fancy way to say that you do something (roast, winnow, refine, add cocoa butter, add sugar, etc) a certain way, evaluate it, and then change ONE item and do it again, noting the difference. You do multiple iterations. It’s by this process that you can learn rather quickly how a given change affects (or doesn’t affect) your overall product and which direction it affects it (do you like it more less or is it just different).

It’s said that it takes 10,000 hours of doing something before you become a true master at it. We aren’t talking about mastery here, but the concept holds. You can’t make the perfect chocolate the first time out. It takes time to learn what you like, what you don’t like and how different parts of the process affect the outcome. But there is something implied in those 10,000 hours that isn’t said out right (I guess that is why it’s only implied). You can’t just do something for 10,000 hours without trying to get better and expect to get better. You have to actively try. You have to pay attention. You have to do it methodically. Doing one iteration after another with intent in mind helps build that mastery. If you spend 10,000 hours throwing darts at a dart board without trying to hit the center you won’t get any better at hitting the center. You have to modify what you are doing with each try (iteration) if you want to have a hope of improving. That’s what the iterative process is all about. And one final point about this. It is critically important to not change too many (the best is 1) things at once. When I was in the lab I watched many very intelligent people fail to understand a system or fix a problem because they changed lots of things and hoped for the best. Every so often it works, you make things better, but you don’t learn anything. And without learning you are no better off than you were before. Those that don’t learn from history are doomed to repeat it an all that. So that is my goal here. Not to teach you how to roast, but to teach you how to teach yourself how to roast (or do anything else) based on a solid process that works.

So let’s do it.

Roast 2 lbs of cocoa beans 18 minutes on P2. It’s that simple. I recommend the profile, weight and time for a specific reason. They give you a direction to take depending on what you think of the chocolate. More beans, hotter or colder profile and shorter or longer profiles.

A quick side note. I make all my test chocolates at 70% nibs, 5% cocoa butter and 25% sugar. Vary it to your taste but having one recipe you use for learning is very helpful.

First off, did you like it and do you think it could be better? Let’s ignore that you got lucky and this is the best chocolate you have ever had and don’t want to change anything. It’s probably not going to happen and isn’t helpful. So what didn’t you like? Let’s go through some of the most common things you might taste and the direction you could try.

Is it green and grassy? It’s possibly under roasted. You have two options.

Increase the time or go to P1.

If the chocolate flavor is there, I would just increase the time by 2 minutes. If it has not really formed, I would increase the heat by going to P1 or reducing the load (not in this case but in further iterations since you started this iteration at the lowest weight recommended).

Is it to a bit acrid? It’s possibly over roasted. It could also be that it was roasted too strongly.

If there is a good chocolate flavor but it has that burnt edge to it, you probably need a more gentle profile. Just go in order. P3, P4 or P5. If there isn’t much chocolate flavor, you may have just roasted too long. Stay on P2 and roast 2 minutes shorter.

Is it too fruity? Increase the roast time a couple minutes or go to a hotter profile.

Does it just not match my tasting notes? Throw a dart or flip a coin to pick what to do next. If in doubt, just change profiles and keep weight and time the same.

I clearly can’t give you every possible taste combination. But hopefully this gets you going. Look for patterns. Start to understand what happens during a roast. Look for some of these items.

Volatile acids are initially driven off. These are not fruit notes. These are like vinegar and other sharp to the nose aromas. Next chocolate flavor develops. Also fruit flavors start to form. At some point fruit flavors start to change and reduce. Nutty and savory flavors can become more noticeable at this point if not before. Finally roast flavors start to dominate. And if you continue, chocolate, fruit and nut flavor is burned away and you are left with a powerful acridness.

The REALLY great thing about the Behmor is that it is nearly impossible to under roast IF you roast not less than 15 minutes. Likewise, as long as you have 2 lbs in there, there is basically no way to burn your beans. You can get to the level of roast flavor becoming noticeable, but I have made perfectly good chocolate on P1 with 2 lbs of beans roasting for over 20 minutes.

Finally, I want to touch on bean type and paint with a very broad brush of generalization. Keeping firmly in mind that what I have said above holds for ALL beans. This next part is really about fine tuning and choosing whether to go longer vs hotter, or shorter vs cooler.

Criollo. Longer is better than hotter, shorter is better than cooler

Trinatario I tend to like longer over hotter and cooler over shorter.

Forastero. Hotter over longer and cooler over shorter.

Notice the pattern?

One other thing to remember. Your bean mass can be used to affect the profile. If you are roasting on P1 and you want it hotter, then reduce the weight of your beans. And you can do it just a couple ounces at a time. But don’t drop below 2 lbs generally speaking. If you are at 2 lbs, then increase the time as it’s your only good option. In theory you could drop the weight even more but you start to defeat the purpose of the very nice profiles if you do. Trust me and all the testing I’ve done and keep to those initial ranges I gave. 2-2.5 lbs, any profile, 16 minutes and up.

One last thing about iterations. If you make a decision (I over roasted, I have to roast less) and take it all the way in one direction (you decide cooler vs shorter) but you have made it all the way to P5 (the coolest profile) and you can’t go any shorter because you are already at 15 minutes with 2.5 lbs of beans, then you need to re-evaluate your initial decision. Maybe you didn’t under roast or maybe you are mistaking the given flavor profile of a bean for under roasted. Even though it doesn’t feel right, try roasting longer or hotter and see what you get. Learn. Oh, and take notes! Don’t trust your memory. After a few roasts you will forget what you have done and that is as good as throwing darts randomly.

Finally, please keep in mind these are guidelines and not rules. If you find that taking Criollo hotter instead of longer give you the taste you want, then that is fine. Do it! These are just what I have learned that work for me over some 2-3000 hours of roasting. Your mileage may and probably will vary. And if you get totally stumped, my door is always open.

1 Comment

4 Comments

Ask the Alchemist #107

Have you found a good sugar grinder that lasts?

Numerous times, when my grinder breaks, I just put the coarse sugar into the melanger. And at first I noticed the chocolate seemed to get smoother, quicker than when I ground the sugar first. I thought it was a fluke. But it just happened again last night—after 10 hours with coarse sugar the stuff was as smooth as it could possibly be.

So here is my hypothesis: when you grind sugar first you get a powder that is probably somewhere between 60 and 100 microns, but many more individual pieces than you started with. And these may or may not get caught under the wheel, and may not even get crushed unless they hit it just right. On the other hand, with coarse sugar you have far fewer individual particles that are larger, and when one of them goes under the wheel it pulverizes. Producing a finer grain size than if it had been put through a spice grinder.

So many levels to this question. Where to start? From the top down is good.

Yes, I have a grinder I like. It is the Panasonic Grinder.

But. Just like the description says, I don’t recommend it for grinding your sugar IF your goal is to reduce refining times. But I love it for Brewing cocoa and making my own Masala and curry pasts. In short, I have noticed the same thing you have and have stopped actively recommending people pre-grind any of their ingredients (whole coffee might be the exception). Your hypothesis is as good as any. But I will add in that I think the sugar, being actually rather hard, is acting as a kind of abrasive and is both self-milling down and helping to refine the cocoa particles in the chocolate. And the larger the better.

The other observation I have made is in regard to melanger speed. My experience has shown that if you put in finer, pre-ground sugar and cocoa it actually makes the mixture thicker and consequently slows down the melanger and thus your refining time. Somehow letting it grind down the larger particles keeps things moving along nicely. So, whether any of those theories are actually correct or it is some combination of all three, the result is that I no longer recommend pre-grinding any of your ingredients. Yes I used to, but I’ve tried to edit those out and if you come across them, please feel free to point them out and I will change them. We don’t want contradictions.

4 Comments

1 Comment

Ask the Alchemist #106

I am a little disappointed in the wild boliva I got. I have thrown away a third of the beans. They are full of webs and moth eaten beans. Can I still make chocolate out of these? I’ve read from some chocolate makers that they are throwing out 30%. I’m assuming you got them from the same supplier. Is that right?


I’m a bit disappointed in the appearance of the Wild Bolivia too. It didn’t match the approval sample. And they are also full of dust. This clearly is not right and I’ve been talking with the supplier and they are likewise not happy. That said, they are what they are. And they still taste fantastic (more on this in a bit).

We have taken to sieving the beans for dust and tossing the worst beans. But that is probably only 2-3%, not 30%. So you may still see something in the beans. But (knock on wood) nothing live. Just old damage.

Regardless, I don’t like it and I just don’t feel right charging a premium for these beans. I have dropped the price by 20%. This is NOT to try and unload them on you. It just like I said. I don’t feel right charging a premium for something not in really great condition. Why am I still offering them you might ask? Because I stand behind my assessment that they are still great tasting beans…..without additional sorting or picking.

But I have partly withdrawn them from the wholesale side. If you are interested in full bags from the warehouse, please contact me directly and I’ll see what is left. I’m not going to be carrying warehouse inventory on this for now.

Up on seeing them (after panicking slightly), I immediately roasted up a batch, as is, without sorting. I let the process do the sorting for me. My winnowed recovery was a little less than normal (74 vs 80%, another reason for the discount) but the nibs looked and tasted great. And the resulting chocolate, although a little different from the sample (which isn’t super uncommon) was still a really great flavored chocolate. Let me show you something. This is yet again that you should not judge a bean by its appearance.

wild-bolivia-v-clean-sm.jpg

That is some of the worst of the Wild Bolivian (not what you would see or receive) and a stunningly prepared sample. The result? No surprise since I am making a point. The Bolivia is full of great character and flavor – AS IS. The beautiful unnamed sample was one dimensional, a bit astringent and mostly a comparative disappointment.

So I say to you again, you do NOT have to pick through these. At least not to the 20-30% level. Analogy time. Say you cut up a nice loaf of bread so you can make stuffing. You take a chaste nibble off half of the cubes of bread and then make croutons and stuffing out of the result. Are you going to notice that you took off nibbles of bread? I challenge you to say yes. You will have less bread (hence again the discount) but it just isn’t going to affect the quality especially if you blow away the crumbs. This isn’t just theory. Every single one of my tests and tasting notes are based on beans as you will receive them.

Why are some chocolate makers tossing out 30%? You would have to ask them. I am not them and don’t agree with it. Visual clues are just not a good indicator of quality. I’ve seen it over and over. Go to the supermarket and check out much of the organic vs conventional. Generally speaking the conventional will look nicer (it’s often bred to be more durable). But generally speaking the organic will taste better (because it tends to be more heirloom, not just because it is organic). Moving on. That horse is dead for the time being.

As for the supplier question. That is a touchy subject. But this has been a ‘full disclosure’ Q&A so no reason to stop now. Yes, I and others got this bean from the same supplier (which I will do the courtesy of not naming). The rub here is that I have been working with this supplier to bring these beans in for me and me alone. But unfortunately they decided it would work better for them to bring in more and sell direct to whomever they wanted. Our gentleman’s agreement clearly fell apart. Many of the customers were ones had I cultivated and only knew about wild Bolvian beans because I was so captivated by them years ago and have been making a big deal of having them again.  To their credit, they have stopped selling them for the time being until a handle can be gotten on the extent of the damage and condition of the remain bags. But I guess life has a way of balancing things out. I’m actually kind of relieved I do not have to deal with a bunch of less than happy people. Lemons to lemonade, what goes around comes around and all that fun such stuff.

So you could say I am somewhat disappointed on this this whole endeavor. The beans are not as nice as I’d hoped. My supplier went around me. Some of you are not super happy. I am not super happy. But it is tempered against others who have stuck with me, who agree these taste just as good as they hoped and at the end of the day these beans still make a damn fine chocolate and for that I am happy and grateful. I would not be offering them otherwise. Please trust me and give them a chance. You won’t be disappointed.

1 Comment

Comment

Ask the Alchemist #105

Conventional wisdom seems to be that the refining equipment available to the home chocolate maker (Premier Wonder Grinder, Spectra 11) is reasonably good at reducing particle size but poor at conching. That leads to lengthy processing times that may reach 48 to 72 hours or longer, depending on batch size, ambient conditions, and bean variety. With the understanding that conching is a very complex process, is there anything that can be done to make home-scale processors more effective at conching and ultimately reduce processing time? From what I’ve read, heat and aeration/ventilation seem to be the critical factors. Is there an optimal temperature for refining/conching? Do home-scale processors aerate the chocolate sufficiently? Should the chocolate be ventilated during refining/conching? Thanks!

First and foremost I would contradict ‘conventional wisdom’. I actually disagree that Melangers are poor at conching. To my mind and taste, they do a fine job. Maybe not as good/fast as purpose built conches, but not poor either. Even purpose made conches can take that same 48-72 hours. But on the same note, I rarely if ever run my Melanger more than 24 hours. And when I do, it is usually because I am just too busy to stop it and pour it up. And the result is that the chocolate does not taste all that different to my tastes at 24 vs 48 hours.

This and most of your questions seem (no offense) typical of many americans. How can I do it faster, better or cheaper? You make a particular point this question is aimed at home-scale. In that very particular case, you would be very hard pressed to convince me you do not have the luxury of enough time to let the process take as long as it takes. To me, it is part of the allure of these kind of projects. And one I have very little interest in speeding up. Enjoy the journey. Don’t miss the beautiful scenery rushing to your destination.

But there are other points to make. Are there ways to make it more effective? Sure. Temperature is the number one item. Give those chemicals more energy and the rate of reaction will increase and your system will become more efficient. And more than that, and why I find this line of questioning acceptable, you will get different reactions at higher temperatures than you will get at lower ones. And as a SIDE BENEFIT the processing time MAY be shorter. But it may not be shorter. It all depends on the bean and your tastes. Chasing the ultimate goal of ‘fast’ leads to lots of frustration I have learned over the years. Just enjoy the process and the results. Which sounds better? The Zen of Artisan Chocolate Making or How to make industrial chocolate fast. Yeah, I’m weighting it one way, but I’m serious. It’s an outlook and approach. Too often e rush around way too much and don’t stop and smell the refining chocolate nearly enough. Ok, the philosophical musings are done for now. Let’s move to a few practical details.

Which leads right to the details of heating, aeration and ventilation.

First off don’t blow hot air across your chocolate. I tried this a few times with a blow dryer and the result were chocolate stripped of flavor and aroma. Next, no, there is no optimal temperature because that implies there is an optimal flavor that is universal to all beans and all people’s tastes. My personal taste for many beans is 130-135 F. Some I’ve taken to 150 F for great results. And other delicate beans go totally bland and limp flavored at 125 F. I think you see what I am getting at. It’s all experimentation and personal tastes.

I personally think Melangers aerate just fine. I have found 2 blades on the Spectra 11 are a little more effective than 1 on the older model or the Premier, but it’s so minor that it’s hardly worth thinking about to my mind. As far as ventilation, yes, it should be ventilated…but you would be hard pressed to seal any of the current Melangers. They are all ventilated. If you are asking should they be ventilated more, then no, I have never seen a difference in lid off vs lid on.

At the end of the day, it’s back to the Zen of Chocolate and a quote I toss out every so often.

Ultimately the quest for Chocolate Nirvana is a solitary path. To know, I must first not know. And in knowing, know I know not. Each Personal enlightenment is found exploring the many divergent footsteps of those who have gone before.

Comment

Comment

Ask the Alchemist #104

I have a tempering machine whose capacity is too small for my needs. But really works well. If I got a batch of tempered chocolate from the machine (still in melted form), and I mixed it with my manually worked batch of milk chocolate would my combined batch become well tempered? .

I am assuming this batch from the machine is equivalent to the seed. Must it first solidify.

However, its not clear at what point I add the seed. Is it after the final cooling and reheating or is it the first time when temperatures drop from 115 to 90?F. .

I feel like I never get to say yes some days. I’m always saying no, and poking holes in ideas that look great on the surface but in practice just don’t work out. .

But not today! .

Yes! You can absolutely do this. I can see no reason at all it would not work just fine. You are just making your own seed. .

It would look like this: .

Temper as much chocolate as you can in your tempering machine and hold it at your working temperature (86-90 depending on your chocolate type, lower for milk) .

1) Melt your bulk chocolate to 95-100 F and then cool to your seed’s working temperature. .

2) Mix your two chocolate together at your working temperature (86-90 F) and use your chocolate. .

The only caveats I have to give is you may want or need to insulate your bowl of tempered chocolate so you have enough working time. .

That’s it. .

And you even have another option potentially. Make a batch of tempered chocolate and let it set up. That is your seed. Melt the chocolate you want to work with according to step 2 above (heat to 100 F, cool to working temp) . Then add a piece of tempered chocolate to the rear area behind the baffle in your tempering machine. Let it run a few minutes. All the seed does not have to melt.

Now use the chocolate. When it is used (and seed is still in the back) just add more untempered chocolate to the front, wait a few minutes and repeat. This is classic seeding. The advantage (in theory) is that you won’t have to stir and keep your larger bowl of chocolate at the right temperature.

Comment

Comment

New Beans in stock

Announcing four new beans in stock.  Two new Peru plus the new crop of the old favorite.  Like I needed more Peru.  But these are great so you need them too! And the LONG awaited Wild Bolivia.Peru FT/Org - Oro Verde 2015 This is the 'standard' Peru that we have had for years - Fruit galore. Peru FT/Org - Lamas 2015  - This is the same region as the Oro Verde but with more nut flavors

Peru FT/Org - Tumbes 2015 - Very creamy with toasted wheat aromas.  This is a different 'Tumbes' than the 2013 crop.  It's a different source all together, hand picked for the quality and tastes.  The new(er) 2015 Tumbes will be in a couple months.  I hope that makes sense.

Bolivia Wild Harvest - Org 2014/15 - These are the wild harvested, tiny flavor packed Bolivia.  Sesame, toasted malt and dates.  And Organic to boot. That is two dozen beans to choose from people.  I hope you enjoy them.

We will see if I can get to Ask the Alchemist.  Clearly I've been busy tasting and getting these beans up for you.

Comment

1 Comment

NY Times Article

It would seem this whole making chocolate at home idea just might be catching on.  And they said it could not be done.  Bah, humbug. Really great article in the NY Times.  Go check it out and/or pick one up in print...they still do that you know.

1 Comment

7 Comments

Ask the Alchemist #103

Almost everything I’ve read both here on the site and in books ranging from hobbyist to professional industry books, roasting and fermentation seem to be a black-box of “flavor development”. There doesn’t appear to be any real hard information either topic. First, for fermentation, traditionally this is just open air fermented with available local bacteria and yeasts and forced to spontaneously ferment until the fermenters think it’s done. As a result of this process, the beans are unsanitary and require roasting/cleaning just to kill off the bad bugs. Is there no research into isolating what strains of what bacteria do what for flavor development? Any research on finding out if a long and slow controlled fermentation may be advantageous for flavor development vs a high temp fast and vigorous fermentation? Think the difference between a Lager and an Ale or going further on the extremes a Lager and a Steam Beer.

With roasting, it seems that almost all of the information is just a trial and error process that you just learn. What are the goals? Is there a specific temp that produces x result. Is just achieving the temperature the goal or is how that temperature is achieved something to think about as well? i.e. is there a difference of throwing a batch of beans in an oven at 500F until the beans reach a desired temp vs starting at 100F and slowly ramping up to the desired temp?

Yep. That about sums it up. But as always, I’ll try to address as many items as I can.

Just because it caught my eye, I wanted to correct one misconception. Fermented cocoa is not made ‘unsanitary’ because it is fermented. It’s made bio-active, but unsanitary connotes unhealthy and/or the presence of pathogens. Much of the ‘unsanitary’ nature is technically contamination, usually from feces. Very generally speaking, native and spontaneous fermentation (sourdough, sauerkraut certain ‘ripe’ cheeses come to mind immediately) naturally produce conditions that inhibit pathogen growth. In most all cases that condition is the production of acids. Cocoa is no different. It’s exactly why you smell vinegar in raw, fermented beans. The microbes produce acetic acid, also known as vinegar. It’s only when the beans are dried out in the open that trouble can occur. Birds, animals, insects, etc. Cross contamination in other words.

Continuing on, fermentations most certainly don’t continue ‘until they think they are done’. That, from our perspective, would give you an over fermented bean, and is WAY past the 3-5 days most fermentations take. It’s totally up to the fermenter (the person) to determine when to stop the fermentation. How they do that is up in the air. Sometimes it’s just ‘3 days’ and is usually just ‘because that’s how I was told to do it’. Hopefully it’s a bit more regimented and it goes until it smells and tastes a certain way. And sometimes, it’s a real art and done until the fermenter, based on a myriad of sensory inputs, says ‘that’s it, they are done’. There is lots of research into what happens during fermentation. Don’t for one moment think there isn’t. But these are complex bio-systems, and teasing that apart into anything meaningful is much harder than you might think. And dangerous if your target or goal isn’t firm. And not dangerous in the safety sense, but in the boring sense. Story time.

I have baked bread for years. Even professionally for a while. And I have to say I am a pretty good baker. But much of the bread I made had a sameness to it. Why? I firmly believe it is we (the American culture) decided to determine the strains of microbes responsible for doing what we saw being done in natural levans (what is often called sourdough now). That lead to isolating a monoculture that allowed us to quickly and reliably make bread rise (instant dried yeast). And my bread did that. It rose. It looked great. It tasted pretty good. But to my tastes it was lacking something. Some spark. Some depth of flavor. A ton of research later I recalled a beautiful book I had across months earlier. Tartine. He (Chad Robertson) talked all about fermentation and that search for the perfect loaf and how he was not finding it with commercial yeasts. My daughter and I started our own culture ala Tartine, and started to learn how to bake bread all over again, and oh the flavors! What had changed? Well, tons of things really, but the largest item was that I was no longer baking with a mono-culture. I was creating with an entire healthy bio-system. I similarly read Cooked by Michael Pollan (thank you Root Chocolate). There are two sections on fermentation (one referencing heavily on Tartine as coincidence would have it), and that same theme of complex transformation is addressed. And now I am working my way through The Art of Fermentation by Sandor Katz (which was also referenced in Cooked, but was on my shelf already before Cooked). And what I consider TRULY amazing (to me) is I didn’t search out any of these books. They all came into my life from three separate, unrelated sources, who all thought they were right for me. And all without having heard these discussions above. Life is just too scary mysterious some days.

What I am coming to firmly believe is that we are not going to ever be able to 100% understand, let alone control these fermentation processes. The absolute best we can do is learn to manage them. And that is only going to come from trial and error and/or tradition. Why do I think this? The most telling case is in Cooked. It describes a raw cheese maker who wanted to understand the complex dance and transformation occurring in the raw, ripened cheese she made. To do that she went off and got a PhD in microbiology. Talk about dedication. And she did indeed learn a myriad of information. She learned how one culture grows until it has exhausted its food supply and dies. The waste products of that first culture set the stage and conditions for another culture to take hold, until it exhausted its food supply and so forth and so on. Such elegance. And at the end of this journey of learning she discovered that the information she had learned didn’t allow her to improve the cheese or control it really any better. It just validated the processes that she already knew!!

Now I’m not against learning and understanding. But I am against taking what you think you have learned of a complex system and simplifying it to ‘repeatable’ and boring. Bud, Kraft, Wonder, and Oscar Meyer are down that path of thinking. Is that what you REALLY want? I didn’t think so.

The crux of the situation is that we simply cannot know everything that goes on in a spontaneous fermentation. There are just too many unknowns. Nearly everything affects the process. To name just a few: variety, age, pollinator, soil conditions, harvest time, moisture, ripeness. And those affect 1000’s of compounds in the cocoa beans. And each in a different way. At the moment, they have identified over 600 compounds related to the smell of chocolate alone. They think they have the top 25 compounds, none of which smell remotely like chocolate alone. When blended together in a particular ratio, our brain says ‘chocolate’. That does not even begin to touch on taste.

This leads right to roasting. What is the goal? To make it taste and smell like chocolate. Really, that’s it.

And for the reasons I stated above, that is all it’s ever going to be. The permutations are just too mind bogglingly huge. Let’s for sake of argument say there are just a mere 10 compounds that affect flavor and can be adjusted by roasting. And to simplify it to a ludicrous, unrealistic degree, let’s just say each compound can either be there or not be there. That gives 3628800 possible taste combinations. If there are 20, that number climbs to 2.4E+10. And I can’t even wrap my head around if different level combinations taste differently or if we had to evaluate 100’s of compounds. The only possible way to say you will get X flavor if you roast this way is to test the specific combination with a particular roast profile (which in itself is so huge to be further mind boggling) and report the flavor….which you and I may not even perceive the same! And sure, there is no way we could tell even 10,000 chocolates apart, but we won’t know what affects that perception unless each is tested. Impossible.

So even if you had a mystical tri-corder and could tell what the compound levels are, there are just too many to test and give results on. And at the end of the day, by the time you compile all that data, you have to make it accessible and to do that you have to generalize which leads us right back where we started. Roast 12-20 minutes with a final temperature 250-310 F. Longer and lower for more delicate beans, shorter and hotter for more sturdy beans. Roast a longer to reduce acidity. Roast shorter to increase acidity. And ALWAYS remember those are generalities. I roasted a batch last week. 55 minutes to 265 F. The most pleasant roast, aroma wise, I have EVER done. And the chocolate was ok. Not great. Not bad. Maybe it needed 270 or 275 or 110 minutes to be great. I just don’t know. But I do know I preferred the same bean roasted to 265 F in 20 minutes. But I have no idea why.

So as much as you want exact answers, they just are not there to give nor can they ever be. The numbers and permutations are just complex. Life is just too complex. It’s that simple. So you are left with trial and error, using your senses to the best of your ability, building your own personal database of experience and going from there. I really and truly wish I could give you more, but I can’t.

Luckily, nature has a way of taking care of itself. Cocoa beans left in a pile will ferment. Fermentations that have gone too far smell of rot (since that is what they are doing, being digested by microbes), so we stop it before it rots. When we roast, the smell should always be nice. Acrid is bad. Burning is bad. It’s innate to us not to like those flavors and aromas. Keep out of the bad zone and what you make will most likely be good. Maybe not great. Maybe not what you were shooting for. But not bad. Trust in that. Accept that I am only going to offer you beans that have been fermented well. Roast so it smells nice at basically all times. And enjoy the experience and the chocolate that you made with your own hands. To borrow from Michael Pollan, enjoy the hand flavor of what you have made. At the end of the day, that is what means the most to me.

7 Comments

Comment

Ask the Alchemist #102

I am confused by your suggested start temperatures of 350-400F. This is almost the temperature range one would charge a batch of coffee!

If I read roasting temperature suggestions here, are they referring to environmental temperatures (ET) or bean temperatures (BT), so indicating air temperature above the beans or approximation of the product temperature? For sure the temperatures stated around tempering are referring to product temperatures. But what about those roasting temperatures?

Even if those temperatures would indicate ET at charge time, they feel quite high to me as in other sources I am reading of temperatures (ET or BT?) in cocoa roasting should not exceed 300F to avoid those burned notes.

Being aware that absolute temperatures depend on machine, probe placement and measuring equipment, I charged my last batch at ET=170C (338F) and BT=138C (280F), quickly falling to ET=150C (300F) and below and never exceeding and BT rising to and stabilizing at 125C (257F) after the initial drop. It turned out quite nice, taste wise. Would those temperatures be too low for a proper debacterilization?

Let’s get the easy stuff out of the way. Yes, those temperatures are indeed the level you would roast coffee at. But I am not suggestion you roast as you would coffee. Your confusion actually makes for a great point. Unless an author tells you what they mean, you really don’t know. Whether it is ET or BT. Most of the time, it is ET as that is how oven are controlled. But it sometimes switches to BT to indicate an ending surface bean temperature. Ok, so that was not very easy or clear, or at least helpful. What it really does is illustrate just how difficult it is to roast ‘by the numbers’ when everyone is using different equipment.

The other easy stuff. In theory, your roasting should be a fine kill step (debacterillization) but roasts rarely (if ever) stabilize at one temperature, so when you say that, it’s hard for me to know what you mean.

So let’s back up a little, and walk through a roast. It’s all about differences in temperature and how you use those and that information.

Charging temperature. Basically this is mostly hot air. Really. I don’t mean it is not important. I mean you are reading an air temperature. And there is not a lot of energy in hot air. It’s the reason you can stick your hand in a 500 F oven and not be hurt. It’s all hot air. So I guess I do mean it’s not really important. At least as a really critical ‘target’ temperature. It, like many other temperatures, are just indicators for other things. Why do we pre-heat our roasters and ovens? It’s so we are not wasting time and energy heating up the surrounding material. It’s so we can get down to the business of roasting. It’s why you pre-heat a grill or a pan. It’s to get the process moving. Nothing more, nothing less. And that air temperature isn’t meaningful as the AIR does not contribute much of anything to the roast. But what is does do is tell you the walls of your roaster/oven are HOT and when we put our beans in, we can get right down to roasting. That’s all. And remember, that air temperature is going to be hotter than the walls. As an example, if the air is 400 F, then the surfaces are going to be something substantially less. 300? 350? And as soon as we load the beans, that horribly hot (sarcasm there) air is going to drop, both through heat lost through the opening and as it goes into the beans and suddenly you will see it is barely above the temperature of the room temperature beans. And with that temperature drop, you are miraculously (and significantly) out of the dreaded “over 300 F” range (which is by no means a hard and fast rule). And I mean seriously out. My average drops are to the low 100’s. It frankly can’t be any other way.

On a quick side note, that you say you drop to a ET of only 300 F and your BT is 280 F…something seems really wrong there. There isn’t any way for the beans to get that hot that quickly. That is an end of roast temperature. It seems obvious to me there is some measurement error there. But it illustrates how hard it is to give a couple temperatures to characterize a roasting profile. Also, you mention that my charging temperature is like coffee. Right you are. Charging temperature only affects the start of the roast. It has almost no effect on the rest of the roast. And I start my coffee and cocoa exactly the same because I am roasting them both.

I said I wanted to walk you through a roast, as I see it. And it doesn’t matter if it’s in a drum roaster, a standard or convection oven, on your stove top (now that’s a real challenge) or some other way. For me it’s all about the delta. In many physics and chemistry equations you have two things you are comparing. Often it’s energy. Or pressure. Or temperature. It’s just a way to describe the difference in two numbers. You are stationary in your car. Now you are going 60 mph. The delta is 60. You were going 20 mph and again you are going 60 mph. The delta is 40 mph. Got it? I know you would. Oh, and why ‘delta’. It’s just the agreed upon symbol. The Greek letter d – for difference. Nothing mysterious there. It’s important here because it lets you think through a roast and how to adjust it no matter the setting. The key is this. And it’s something you already know intuitively. The hotter something is compared to something else, the faster the cooler object will heat up. To rephrase, the greater the delta, the faster something heats up. In roasting, if you want something to heat up fast, you make a large delta. You want the turkey to cook faster, it goes in a hotter oven. You want to the car to go faster in a short amount of time, you give it more gas. See, you know all this. It’s a matter of applying it. So onto a roast as I see it.

It starts with charging temperature. I want the beans to increase in temperature at a pretty fast rate. To do that, I need a large delta. How large? That’s our first bump. For my drum roaster, I like about 60 F (and I mean 60F over room temperature – it’s the delta, remember?). For my standard oven, I like 100-120F. Why the difference? The semi-technical answer is convection. Basically, the more you stir something, the faster it can transfer heat. My roaster moves air. Most ovens do not. How did I find those numbers? By experimenting and roasting for the last 15 years. No, it won’t take you 15 years to learn how to roast. It took me that long to figure out how to describe what I was doing intuitively. I was roasting well in a few months. Moving on. So, I want a delta of 60. That means, if my beans are 70 F, and after everything ‘settles in’ after I put my beans in, I want the air temperature to be about (70+60) 130 F. And so I pre-heat to a level in my roaster that EXPERIENCE has taught me will give me 130 F. That means missing the mark sometimes. For MY ROASTER in MY SHOP, if I am roasting 5 lbs of beans, I need an initial temperature, on average, of 350 F. If I’m roasting 4 lbs, I might only go to 300F. And if I stuff 6 lbs in, I better take it on up to 375 F. In all those cases I should see 130 F after a minute or two for my air temperature and my bean temperature will be 75 F or so. Now, notice I said ‘on average’. That’s my loop hole. What if it is 50 F in the shop. That is another delta. Between my roaster and the outside environment and because there is a larger delta than ‘normal’, I am going to lose heat faster from my roaster, so I need to compensate by increasing my inside roaster delta a little by preheating a little higher. Maybe 375F (as opposed to 350) for 5 lbs. Or if it’s really hot in the shop, say 95 F, I can go cooler and only pre-heat to 300.

Yeah, it’s a lot of numbers. But are NOT supposed to memorize them. What I am trying to get you to do is ROAST. Roast. Keep notes . Learn YOUR roaster in YOUR home. And adjust accordingly depending on what your conditions are and what you want your roast to do.

Which is exactly what I do next. Control the roast. It’s kind of arbitrary, but I define ‘roasting’ as the continuous increase of temperature of what you are applying heat to. That means I always want the air temperature (ET) to be greater than the beans (BT). If it’s not, then there is zero delta, and if that is the case, there can be no temperature increase and that isn’t roasting. It’s stewing or braising or something other than roasting. How fast you want your beans to heat up is at the end of the day up to your tastes, but I like the whole roast to take between 14-20 minutes. What that means is I need to keep a large enough delta to keep those beans heating up so that I hit that time window. Again, experience has shown me that a delta 60 works well for me as my standard conditions. Up to a point. What happens at around 212 F? Water boils, right? Well, cocoa beans contain water and water takes a lot of energy to heat up and even more to drive off. What that means is that once my beans get to 215 F they have driven a lot of water off. Suddenly I need less energy or less delta, to keep the beans heating. It’s like carrying a back pack and putting out a certain amount of effort to go a certain speed. If you put the pack down, you need to expend less effort to go the same speed. If you keep putting in the same effort, you will go faster…and you don’t want that in a roast as that is a good way to get those burned notes. So that means decreasing your delta. In my drum roaster, that means decreasing the amount of fuel I am feeding and letting the temperature gap close. In an oven, that means turning down the thermostat 25-50 F (just like you have seen me recommend). At this point I like a delta 40 and I tend to keep it there for the next 1/3 of the roast or so. During that time, water keeps leaving. This is because we have been following the surface temperature of the bean. The interior is cooler and so contains water still. As that water leaves, you guessed it, we have to decrease that delta again or the roast will progress too fast. And really, it just keeps on like that until I’m down to a 10-20 F delta and my bean temperature is 250-290. Painting with a broad brush, Criollo tends to like a cooler final temperature than Forastero, but you have to determine that for yourself. Personally, I tend to roast all beans at least until I hear a few pops, and then 10-20 F more. Also, I tell A LOT by smell. Acrid almost always says your delta is too large. It can also indicate you are at the end of your roast or you are in the 260-290 range. I often end a roast if all the conditions are right. i.e. time is 14-20 minutes, temperature is 260-290, it is not acrid, pops have occurred (which don’t always) and the smell changes and softens.

So, what you might notice here is I too keep my air temperature below 300 in basically all cases. Even if I am roasting a robust bean that likes a high final temperature of 290, my delta is going to 10 or so. But even with that, I have a smaller sample roaster that I need to keep the delta larger because it is losing heat to the environment. For that one, my air temperature is often 320 F with a bean temperature of 285. There are just very few hard and fast rules. It’s all about technique and learning your roasting set up.

To really drive that point home, it’s like a new driver asking ‘ how hard to I have to push the brake to stop at that stop sign up there?’. How do you answer that? Hard enough to drop your speed so that you never skid, but don’t over shoot either. And you will have to apply less brake as you get closer’. Sound at all similar? It’s exactly the same. And the answers all change if you have a heavy or light load, if it’s raining or icy and how fast you are going when you start. If you are reading this, I suspect you drive. Think of it exactly the same way. It’s just a matter of learning to drive your roaster. Nothing more, nothing less. And you are only going to learn by doing, messing up, and learning from those mistakes. I can only give you suggestions and what worked for me.

Comment

Comment

Ask the Alchemist #101

I was reading about a process implemented by Bühler (a maker of coffee and cocoa processing machines) that applies dry steam of water for 25sec under 5.5 bar pressure directly before drying and roasting the beans. They say this reduces the infection from 100 Million anaerobe mesophile per gram to less than 100.

Now I wonder if it makes sense (despite your “no”) in my home setup to take the strong and dry steam of my commercial grade espresso machine (a vintage model with a 5 liter boiler) and blow it over the beans for half a minute immediate before roasting them? Could that have a positive effect?

The pressure in my machine is about 1.1bar, but a lot of this pressure is lost while spraying at the beans. I just thought that the high temperature could be of any use ( boiling or at least boiling temperature at the moment hitting the beans).

Unsurprisingly my answer is still 'no'. And the why is because your home steaming would not be under 5.5 bar pressure. That is critical to the kill rate. Without that, it serves no purpose at all.

As for the steaming option, and the link to that page, I will point out the first thing I saw:

"Basically, a debacterization is not absolutely necessary. The normal roasting process is quite sufficient for the number of bacteria sufficiently reduce and to comply with legal requirements."

I’ll grant that 212 F can burn you, but there just isn’t a lot of total energy there spraying out of your steam wand. And it is completely uncontained. It’s just blowing past the beans. And the top of them at that. There is too much hidden space that isn’t seeing even that temperature. That is another reason that the beans are pressurized. It contains all that energy.

For your machine, that is 1.1 bar total. Atmospheric pressure by definition is 1 bar. Totally disregarding (for the moment) that it drops instantly to 1 bar as you steam, and loses a lot of heat, it at a 10% increase as opposed to what they use: 530%. To put it in perspective (in a loose allegorical way), say it takes 530 lbs of crushing force to kill you. But someone puts 10 lbs on you. Are you going to die? Or even be hurt? Even if it is put on your for a hour? Or a day? See what I am getting at?

That said, they do make a nice point that the introduction of moisture to the whole beans will facilitate a nicer separation in some beans of the husk from the nib. But again, it takes pressure or time to inject that moisture. Just hitting the beans with atmospheric steam is not going to penetrate very well.

I am not trying to be a nay-sayer. I just would hate to have you waste time for no purpose or reason.

Just roast the beans well, starting with a good high temperature (350-400 F), and your bacteria counts will be just fine.

Comment

3 Comments

Ask the Alchemist #100!!

I just got a new infrared thermometer for Christmas that I want to use to make chocolates and candies. I have gone through so many digital instant read thermometers that have been dunked in chocolate, dropped or soaked that it was time for something new.

It has an adjustable emissivity setting but I'm having a hard time finding information on the emissivity of chocolate and melted sugar/caramel. I'm excited to get started but I know the accuracy is highly reliant on using the correct emissivity setting. Am I just looking in the wrong places or do people not usually use infrared thermometers in the kitchen?

First, congratulations on your new toy/tool. I personally use one in my own kitchen and for my own chocolate making. But only for certain items. And only after verifying them with a contact thermometer that I have personally calibrated beforehand.

And that sums up my entire answer to your question. If you notice, I didn’t mention emissivity at all. The reason, in short is summed up in this disclaimer that you can find on nearly every emissivity table.

"The accuracy of the following figures is almost impossible to guarantee as the emissivity of a surface will not only alter with regard to texture and color but also with its actual temperature at the time of measurement"

Nice, huh? What I take away from this is that the table is good for one thing and one thing only. Looking up to see if your surface is close to 1.0. If It is, great, you have a CHANCE of using your IR thermometer. If it isn’t, then just don’t bother because the value is worth the paper it is printed on.

Ok, before we get much further, I would be negligent if I didn’t digress and actually define some of the terms and technical jargon that I’m using. First off, the potentially too technical version:

"Emissivity is a measure of the efficiency in which a surface emits thermal energy. It is defined as the fraction of energy being emitted relative to that emitted by a thermally black surface (a black body). A black body is a material that is a perfect emitter of heat energy and has an emissivity value of 1. A material with an emissivity value of 0 would be considered a perfect thermal (IR) mirror.

For example, if an object had the potential to emit 100 units of energy but only emits 90 units in the real world, then that object would have an emissivity value of 0.90. In the real world there are no perfect "black bodies" and very few perfect infrared mirrors so most objects have an emissivity between 0 and 1."

If you get that, great and wonderful. If not, let’s break it apart a little. Infrared thermometers read the incoming infrared radiation that a surface gives off (emits) and translate that to a temperature you can see. Most people don’t think of surfaces emitting radiation (they do). On the other hand, most people understand that a surface can be reflective. Mirrors are reflective. Shiny metal pots are reflective. If you have the chance of seeing yourself reflective in a surface, then it’s reflective. And if you have that down, then thinking the opposite direction tells you if a surface ‘emits’ well. For our discussion, reflector and emitter are synonyms. The real world use of this goes like this: “can I see or sort of see myself in that thing I want to measure?”. A mirror? Sure can! Then it is a reflector and if it is a reflector it can’t be a good emitter. It’s that easy. Where it gets difficult (sort of) is a when a surface is ‘sort of’ reflective. But really, it’s still easy. “Is that glass kind of reflective?” Yeah, kind of. Then it will only be sort of good at emitting and since we need only really great emitters then that surface in question is no good for an IR thermometer.

"If you were to point an infrared thermometer with fixed emissivity at the side of a stainless steel pot filled with boiling water, for example, you might get a reading closer to 110°F than 212°F. That’s because the shiny metal is better at reflecting the ambient radiation of the room than it is at emitting its own infrared radiation."

And really, that’s all the tables are really good for. Giving you a quick idea whether you have a good emitter or not. There are a few curve balls in there. Glass blocks infrared so all bets are off there. And in theory water emits well, but my experience says the pot it is in and how close it is to boiling changes your readings a lot. And gravel. It’s not reflective. Should be a great emitter…but practice rules the day. It reads somewhere around 0.3. Like it is a polished surface. Go figure.

Let’s get to the practical now, like they did for that gravel. You have a IR thermometer with an adjustable emissivity setting. Great. You can adjust (or calibrate it) for a given surface (the stainless steel pot above). But you would not do it by looking up the value in a table. They make a big deal about the lack of accuracy of those tables remember? You would do it by placing a probe on the surface and then pointing your IR thermometer at it (but not on the tape) and changing your setting until the two readings are close enough for you. Just like this.

ir-vs-k-surface.jpg

But now the chemist in me rears its head. And maybe you caught it too. How do I/you know the probe is any good? Well, you HAVE to verify it. How? Well, you put in on something you know the temperature of. For you (and me) there are two things in your kitchen you can count on. Ice and boiling water. 32 F and 212 F (or a little lower if you are at elevation – google it or ask me). I picked that thermometer you see because time and again it reads within one degree at both ranges out of the package every time I test one. That’s why I offer it. So you don’t have to calibrate or verify it if you don’t want. Because honestly, most people don’t think to or even know they should, and I know and accept that. But now you do, and should.

This all comes back around to wanting the emissivity of chocolate. But hopefully, by now you see you were looking for something that even if you found it, would do you little good. What you want to do is this. ir-vs-k-probe.jpg

Do they match (you verified that other thermometer, right?)? If so, then you are done. If not, adjust the emissivity setting until they do. That’s all there is to it. Oh, and my opinion (again worth the paper it’s printed on)…chocolate. Sure. Melted (reflective?) sugar (in a shiny pot)….maybe but I wouldn’t hold my breath. But you were going to verify it anyway.

3 Comments

1 Comment

Ask the Alchemist #99

In making chocolate cream ganache for truffle centers, I have in the past followed directions to put the freshly made ganache in the refrigerator to firm up for center rolling. I recently have read where that is bad. It is better for crystal formation to let it set up at cool room temp for a few hours, even overnight. That refrigeration inhibits good formation. Which is it? This also is important to me because I have tried using the newish silcone truffle molds (truffymold ) which say to pipe the freshly made ganache into the molds, put it in fridge for 24 hours, then freezer for 12 hours. It does make it easier (and less deformed) to freeze before popping out. Would it be better to let the ganache set out overnight at cool room temp then put in freezer for the 12 hours to be able to pop out? Is the freezer time going to be bad for the ganache? Scared of the cold!

There are good points in each of these various thoughts and I’ll go through each one and explain my thoughts on them and how each is applicable.

I’ve never heard that it was bad to put truffle filling in the refrigerator. I personally do it all the time and have never had an issue. If anything, because I like my filling to melt in your mouth instantly I prefer a very soft center and the only way to work with it is to either refrigerate so it is hard enough to scoop or pour/pipe it in to molds and then refrigerate it. That said, I will also note that I don’t usually fully refrigerate the ganache as it can make it too hard to work with, and just chilling to 50-60 F works really well for me.

As for refrigeration inhibiting good crystal formation, that makes no sense to me. Namely because to my knowledge there is no crystal formation going on anyway because you have added cream and that inhibits all crystal formation. Basically you have seized your chocolate on purpose, but seized it nonetheless and once that happens, no crystal formation is happening.

I don’t see anything wrong with piping into silicone molds and then chilling. I’m one that tends to follow directions…at least initially, so I would do as the manufacturer suggests. It actually seems to me that it is a bit excessive to refrigerate and then freeze, especially for that length of time, but maybe they have their reasons. Or maybe they don’t. I would try it that way, and compare it to refrigerating a couple hours and freezing a couple hours.

I likewise don’t see any trouble with freezing the ganache from the ganache’s standpoint. But I will point out one thing that might give you an issue. You may need to bring your frozen ganache centers up to something other than freezing for some length of time or you may run into problems.

The two issues I see are water condensing on the centers and the radical difference in temperature making enrobing them in chocolate very challenging. You might get water in your coating chocolate and the coating can get very thick respectively. Off the top of my head I would suggest letting the frozen centers rest in the refrigerator 12-24 hours before enrobing. Or if the shorter chilling time works, just doing that. 2 hours in freezer, 1 hour in refrigerator, enrobe. Basically see what works for you. In any case, don’t fear the cold.

Happy new year everyone.  And keep and eye out for the historic (just because of the number) Ask the Alchemist #100!!

And keep those questions....Really....I'm nearly out.  You can e-mail them direct to question at chocolatealchemy dot com.

1 Comment