


Level: Novice
Reading time: 8 minutes
I want to make drinking chocolate. Can you give me a recipe?
I’ve touched on parts of this in the past but now is a good time to bring all the options together.
Daily musings and writings from the Alchemist
Viewing entries in
Ask the Alchemist
Level: Novice
Reading time: 8 minutes
I want to make drinking chocolate. Can you give me a recipe?
I’ve touched on parts of this in the past but now is a good time to bring all the options together.
I have learned that some makers (myself included) are lightly baking (in the oven at ~170F) their sugar on a baking sheet before it goes into the melanger. The idea being that the higher temperature of the sugar will maintain the liquor at a higher temperature allowing you to feed the sugar into the melanger more quickly. I have however
Level: Apprentice
Reading time: 8 minutes
I have been making a batch of chocolate, but I am unable to lower the acidity taste (vinegar like) that i sense on my chocolate. i have been trying to find a solution, and nothing so far. Maybe you can help me lower that acidity taste I have. The mix is 65% cocoa and 35% sugar so far and no powdered milk.
Ask The Alchemist #182, Question: I got a Behmor (exciting new toy!!!) just did a roast of 500g beans on 400/P2 and they have come out black? Is that normal for drum roasting as I have never had this in the oven and worried that I have burnt them??
Ask The Alchemist #181, Question: Have you ever tried tempering chocolate with a Sous Vide?
Ask The Alchemist #180, Question: Have you ever tried tempering chocolate with a Sous Vide?
Level: Novice
Reading time: 4 minutes
I was just wondering, how important is a melanger is for this recipe of white chocolate? I know it’s important for grinding regular chocolate, to smooth the texture of the cocoa solids – but does separated cocoa butter need the same grinding, or is it already quite smooth? I’m sure it’s both useful and convenient, but I was curious if it is indispensable to this recipe or how much of a difference it would make to try making white chocolate without one.
If the use of the santha grinder in this recipe is grinding the powdery ingredients (sugar, milk powder, soy lecithin) into the cocoa butter, could pre-grinding those ingredients very fine (say, to maybe a powdered sugar texture) make a good white chocolate without needing the santha grinder?
A melanger is indispensable for any chocolate be it dark, milk or white as long as you are defining chocolate as modern chocolate with a smooth and silky texture.
Cocoa butter doesn’t need further grinding by a melanger, but everything else you add does.
Nothing available by the home chocolate maker can get chocolate as smooth as a melanger. I’ve tried everything I could think of and they all fail to do the job.
The reason has to do with the vague term “fine” or “very fine”. Those just fail to mean much of anything. Sure, powdered sugar is fine compared to corn meal, but both are coarse compared to the particle size of the sugar once it has been refined in the melanger.
And that is worth noting. It isn’t just, or even primarily, the cocoa solids that are getting refined down. It is the sugar and milk powder. Let’s get away from ‘fine’.
The sugar and any other solids in chocolate are in the 10-15 micron range. That is 1/100 of a millimeter. In contrast, granular sugar is somewhere around 500 um( microns). Fine castor sugar can get down to half of that. Now, if you go searching around you will find that 10x superfine sugar can reach 15 um. Home free right? Unfortunately not.
Commercial powdered sugar contains cornstarch and/or other anti-caking ingredients which can lead to a gummy chocolate. As for powdering your own, I just tried it. I was able to get down as low as 25 um, but there were still some pieces larger than 50 um. And that size will be coarse in your mouth.
I even tried filtering it through a sieve, and what came out was in the 10-15 um range. The problem though was that I could only get about 10% of the sugar through (less than 1 oz) before it started clogging and caking (hence the anti-caking in powdered sugar).
Really, it isn’t a viable method for anything more than just a couple ounces of chocolate.
Finally, that neglects the aeration and minor conching that occurs in the Melanger. Non-refined white chocolate has to my tastes this odd, harsh taste that goes away over the 12-18 hours needed to make white chocolate in your Melanger.
There you go. There is no making modern chocolate without a Melanger at the minimum.
Level: Alchemist
Reading time: 20 minutes (if you are lucky)
Question: Time? Things are considered tempered when you take a test strip cool it and it has the characteristics you want. My question is does this happen rapidly, say 95% of the fat is in “V” at 10 mins, or is “tempering” when say 50% of the crystals are in the correct form. Does extending the time at temperature to say a day or 2 get significantly closer to 100% in V? Does this make a difference? You probably reach a point of diminishing returns, just curious how much science has been applied to this voodoo…
Funny you should mention voodoo. As I am going to take this into the exact opposite direction and define tempering in technical terms.
It’s worth noting that as I think of all I want to convey I feel like the philosopher who has attained enlightenment from the study of a butterfly wing and now wants to convey it to everyone….and takes page after page explaining it and ultimately fails because you usually can’t explain deep concepts quickly or easily. Regardless….onward.
Chocolate is tempered properly when the inflection point of the of a temperature vs time cooling plot has a slope of zero.
And I suspect that doesn’t mean or explain anything to most of you. If you have a look around the internet you will find this old school image pretty quickly.
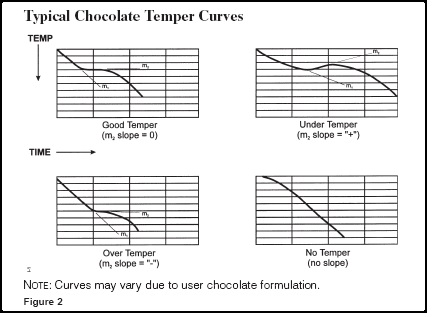
Digging a bit deeper and you can find something like this that shows real data in a form more of you can relate to.
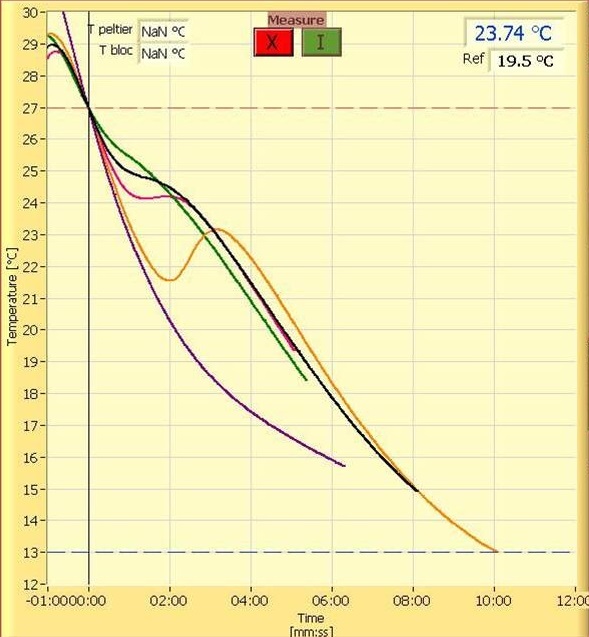
In both cases they are showing plots of chocolate in different stages of temper, from untempered all the way to over tempered.
And I want you to read that last line again. There is something very important there that takes many people many years to realize. The first epiphany as it were. Over tempered. Chocolate can be over tempered. Understandably a large number of people think you want 100% temper. All Type V crystals. But that isn’t the case. You want a balance.
So that answers a part of your question. Or more to the point, it sheds some light on some of the assumptions you have made about tempering. That it is an end state. Sort of like absolute zero. And maybe it is. The key here is understanding that IF the perfect temper is analogous to absolute zero, then your goal is NOT absolute zero, but some temperature above that.
Try and let that sink in. I’ll try and explain why that is at the end.
But before we get deep into all the revelations that those plots can give us, let’s take a few moments and talk about what you are seeing there.
WARNING – SCIENCE AHEAD
Pretty much all of tempering is predicated on the concept of crystallization.
The following concept is one you need to wrap your head around.
Solidifying fat crystals give off heat in the same way dissolving salt crystals take in heat. These are the two sides of the same coin or concept.
That doesn’t make sense? This puts it into tangible terms.
If you make ice cream the old fashion way, you will recall you mix ice with salt. Remember that? Do you know why? Solid salt is just sitting there. It has low energy. Salt in solution is moving around. It has more energy. That energy has to come from somewhere. In the case of your ice cream and ice, it comes from the temperature of the system. Ice cream, ice and salt separate are all at 32 F. If the salt needs energy to dissolve, then it has to steal it from somewhere so it takes it from the only place it can; the temperature of the ice cream and ice. The result is that those temperatures drop to something under 32 F as the salt dissolves and your ice cream solidifies.
Got that? The whole point is to melt a crystal it has to take in heat. Therefore the opposite is also true. To form a crystal, heat is given off. This heat is called the heat of crystallization. To go all science and geeky on you:
“Heat of crystallization or enthalpy of crystallization is the heat evolved or absorbed when one mole of given substance crystallizes from a saturated solution of the same substance.”
Let’s bring this back to chocolate and set the stage. You are in the process of tempering your chocolate. You have either made or introduced seed to your untempered chocolate. For the sake of discussion, let’s call it 31 C. You pour it up into your mold and it starts to cool and eventually set up.
If we peek behind the curtain, and can monitor the temperature and crystals we are going to see the temperature start to drop. That is just the natural cooling of the chocolate. Energy is being given off to the atmosphere or maybe your refrigerator. At the same time, the seed of Type V crystals are going to start propagating or growing.
And now the fun part (did I mention I’m a retired chemist who finds this fun?).
We can make a prediction. As the crystals start to form we know (see above) that they are going to start giving off heat to the surround chocolate. And what is that going to do?
Very good. The temperature is going to rise.
And if we record those temperatures and the time, and then plot them, what is it going to look like? It is going to be a decreasing line (the temperature is falling initially because it is in the refrigerator or whatever) then, (oh, I’m so excited) since those crystals are giving off heat, (I’m virtually giddy here) the line is going to level off or maybe (shaking with geek excitement) even go back up! Then, once all the crystals are formed and no more heat is being evolved (yep, pulled in a science word there) the temperature will continue to drop to whatever the ambient temperature is.
Do you have that image in your head? Hopefully, it looks a LOT like this:
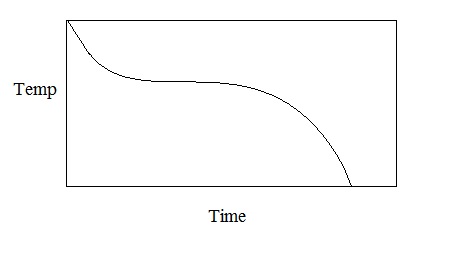
Which, wow, looks pretty much identical to the plot at the beginning for properly tempered chocolate!
Science!!! (giddy again….calming down…. )
Okay, I’ve calmed down for the moment. Hopefully you have the concepts down and we can talk about what they mean.
The first thing I want to address is that a zero slope (that flat spot) is nothing special. It is empirical meaning that it is just lucky coincidence that the majority of we humans like our chocolate when it is tempered at a zero inflection.
If you go back to the top and have a look at the curve of untempered chocolate you will notice it is basically a straight line pointing down.
“But alchemist, even bloomed chocolate has crystals. Type III, IV and V. Don’t they have a heat of crystallization and wouldn’t they cause some heat rise?”
I am proud of you for making that connection. It is 100% true. IF…and this is where I didn’t play straight with you…we were truly measuring the temperature of your chocolate as it set up. But that is not what those plots are from. They are actually from a special setup that measures the degree of temper in a chocolate. It basically looks like this:

This image and the text below on It’s workings is from Ticor systems
“Their operation is quite simple. A cup-like opening at one end of a long metallic (copper) tube is filled with a chocolate sample. The other end of the tube is inserted in a mixture of ice and water held in an insulated container. A temperature probe (thermocouple in early versions) is then inserted into the chocolate. Since the chocolate sample is above 85°F and the sample holder is attempting to reach the temperature of the ice bath (a questionable 32°F), the chocolate gives up heat to the holder and is cooled to solidification.”
The key difference here is the ice bath and that in a degree of temper analysis you are forcing the chocolate and temperature down quickly along a reproducible path (because is a constant temperature and the system is insulated). The consequence of this is that you can see deviations easily and you are literally forcing the chocolate to solidify without crystallizing. Because no crystallization is happening, no heat is given off and no rise in temperature is noted.
Got it? Good!
And now we can talk about some of those bits of enlightenment that fall out of these graphs.
If you look at the 2nd graph above with all the overlaid plots you see a spectrum of non-tempered curves all the way to over tempered. This means tempering is a continuum and what falls out of that is that tempering is not a discrete state but a process and because we can have a full range of tempers we can have variables that we can adjust in a predictable manner to give us those final degrees of temper.
What are those variables? Well one big one should be obvious. The amount of Type V seed you have present and the original question hints at that. And that makes sense. The more seed you have, the more energy that is given off in a set amount of time and the more the cool curve tips up. Likewise, if you don’t have enough, it doesn’t tip up enough, the slope of the line doesn’t make it to zero, and you have under tempered chocolate, and if it is under tempered too much, it can bloom.
So, is time something you can manipulate? Will more time (2 days?) give you a higher degree of temper because more seed is formed? It certainly seems like it might be, and it can be, but it turns out that it isn’t practical. And the key is understanding that time is only helpful if it is your only variable. And in many cases it isn’t.
If you are tempering from scratch it is useless. Why? Because when you bring your chocolate down to 80 F or so and form seed, how much you form is varies with how fast you reduce the temperature and the ambient temperature. Without being able to control those exactly, you will have different amounts of seed (which you have no way of knowing) and that basically means you are starting from a different point in the tempering process each time so you can’t get to the degree of temper by measuring time.
If that isn’t clear, think of it as getting a car up to 60 mph (perfect temper, zero slope inflection) from a random unknown speed with only a stopwatch. It can’t be done. There are too many variables. How fast are you going (how much seed initially), how much are you accelerating and how do you measure it (what is the ambient temperature) and are there hills that you have to go up or down (how much heat loss do you have).
This is why hand tempering can be a series of failures until you both get a feel for how fast 60 mph is and you get used to the road (i.e. your techniques and conditions get VERY reproducible).
So what are you to do? You use some form of seed. And a tempering machine or water baths if you can. Neither is magical. They are nothing more and nothing less than variable control and management.
When you use seed or silk you starting with a known amount of seed, and better yet (analogy shift warning) your speed IS 60 mph and you just have to maintain it by watching the speedometer (your temperature).
If you want a lower degree of temper, you use less seed/silk. If you want I higher degree of temper, you use more. That simple.
So, it was probably hard to miss that I mentioned both seed and silk. The distinction is that the former is tempered chocolate and the latter is tempered cocoa butter. And they produce different tempers. Not just different degrees of temper, but actually different types of temper.
S. Beckett (The Science of Chocolate) notes this:
The temperature at which the inflection on the curve occurs is very important. The higher the temperature the more mature the crystallization and the higher the temperature at which the chocolate can be used for moulding and enrobing.
Silk makes for a more mature crystallization and is my personal favorite way to temper (video of that coming up). You can see this by how it is used. You mix it in at around 93-94 F. You use significantly less (0.5-1%) than you would tempered chocolate (20-30% many people recommend) and it propagates very fast through the chocolate, setting up quickly and with a particularly high resistance to blooming. And if you were to run a cooling curve on it you would see it produces the inflection point at a higher temperature correlating with a more mature crystal.
Is this all helpful day to day? I personally think it is since I wrote it. How? I think 90% of the help it gives is taking some of the mystery out of tempering (after you reread it a few times). It is just variables and if you grasp that, you can start to look for variables in your process and eliminate them or at least identify them when something goes awry and you chocolate blooms.
Can your or should you set up your own temper meter? If you find it fun and like the hard data, by all means do it. It isn’t hard. It is basically a thermometer and an insulated ice bath. You will probably have to play around a little with your sample size to get a flat line for untempered chocolate but that is about it. But of course you don’t have to. Hell, I LOVE this stuff and have not done it. But you can.
Oh, one more thing.
Remember I said I would explain why you don’t want an absolute temper? It’s really kind of simple. Mostly it is because you are a person eating chocolate and not a chemist striving for a perfect beautiful crystal. You are not looking for perfection in structure. You are looking for perfection in mouth feel. You are looking for an experience. You are looking for that perfect state where the chocolate is smooth and melts easily in your mouth. That point of state that allows maximum release of flavor and enjoyment. You are looking for the perfect tipping point where it is almost bloomed and almost too hard.
You are looking for balance.
I hope that was enough science to this voodoo we call tempering.
Welcome to the art AND science of chocolate making.
Level: Apprentice
Reading time: 10 min
i want to make chocolate peanut butter. So can i use such grinder I can make in 2 steps namely 1 grind peanuts with cocoa powder and sugar in grinder then for proper and smooth consistency like nutella grind in such stone grinder
You can use the Spectra 11 to make a variety of things. Nut butters and their variations are one of them. Since you can also make praline (hazelnut and sugar) there is no reason you cannot make your peanut butter chocolate creation. But you may or may not run into some practical considerations.
The main issue you are going to run into is that if your goal is something like Nutella, it may well be too thick for the Melanger. It is spreadable and does not really flow. At least if you produce it with the standard Nutella ingredients.
This is one of those times that the use of cocoa powder is called for. If you are keeping traditional as it were Nutella consists of the following:
If you do some calculations you will find that it is about 30% fat, which is a touch lower than the recommended 33% fat for most chocolates. Lower than 33% and your mixture may be too thick to work properly in the Melanger.
But you were asking about peanut butter, not Nutella. In that case the gloves are off and you no longer have to follow those proportions. And it is also worth noting that neither peanut butter nor Nutella are actually as smooth as chocolate, which will also work to your advantage. As will the relatively small amount of cocoa powder the above recipe calls for.
I would recommend first off making sure you are using roasted peanuts. The same moisture rule applies to nut butters as it does to chocolate. Too much water will cause the nut butter to get very viscous in the Melanger. It may flow with it stopped but the sheer makes it push back as it were. I once almost broke my melanger trying to grind raw almonds. It wasn’t pretty.
So start with your peanuts. How much? I’d start at 60%. Unlike chocolate that is a solid at room temperature, peanut oil is a liquid so you can avoid having to heat them and the Melanger bowl. Add them a bit at a time until you have as much as your recipe calls for. I would suggest giving it probably an hour or two to grind before continuing with your next addition.
That would the sugar. Even though the Nutella recipe is 55% sugar, I would start off with 25% and see what you think. Again, I would give that a couple hours to grind down. You can always add more and keep grinding.
Now you come to a decision. I said before that cocoa powder would be ok here. And it would be. At around 7% you could very possibly just stir it in and be done. Remember, Nutella isn’t as smooth as chocolate. Except we are not exactly following the recipe and to make it to 100% total, you are going to need around 15% and past experience has shown me that the melanger is going to have trouble with that. So, you can either try stirring it in and being done, or, try this upping of the ante.
You have gone through the trouble of using a Melanger and fresh ingredients. I would suggest going ahead and dropping the cocoa powder and instead use roasted cocoa nibs. Just put the 15% cocoa nibs (don’t forget to warm them) right into the Melanger. Since cocoa is about 50%, this gives you the same percent of cocoa in your mix as Nutella but has the advantage of that you will be adding some cocoa butter which will help thicken your mixture (since it sets up at room temperature) without the need for high sugar and other ingredients. And keep in mind it will be a bit thinner in the Melanger because the cocoa butter is melted.
And after all that, I am going to toss out one more piece of advice that is closer to how I would actually approach this. At least the first time as I am formulating the exact recipe I want. Keep in mind I gave you some approximations (60% peanut, 25% sugar,15% cocoa nib) that may or may not be to your tastes both flavor wise and from a consistency/viscosity standpoint. And at the same time I’ll show you why Nutella has some of that vegetable oil in it.
When I did this I made a batch of sweetened peanut butter and a batch of chocolate and mixed them together (in the kitchen, in bowls, not the melanger) until I hit the flavor proportions I wanted. For me this was 25% sugar in each. Then I mixed them in small batches at various proportions until I hit the flavor I wanted. 75% peanut was both too peanut heavy and too thin. 75% chocolate didn’t have enough peanut flavor. For my tastes 45% peanut butter was just about right but it was too thick. It was like a chocolate fudge and not spreadable at all. Enter the vegetable oil. Or close enough. Since I already had peanuts in there I added a small amount of peanut oil until the consistency smoothed out to where I wanted it. In this case it was about 7%.
And a little tip. When you are testing your proportions, I had the peanut mixture about 60 F and the chocolate at 90F so when mixed, the chocolate set up. It saved me time waiting for it to cool and solidify.
Once I had my proportions, I was able to make it in the melanger in one go since the cocoa butte kept it fluid while hot but solidified just right when cool.
So there you go. Three different ways to make a sweetened chocolate nut spread. See which one works for you and your tastes and go from there.
Level: Alchemist
Reading time: 7 min
So I have the revolution X chocovision tempering machine.
I am noticing at our apartment temperature being an average of 74F our chocolate does not hold nearly as well as others. I have a bar from fruition, rogue, dandelion, etc etc all at about the same 70% ratio and they seem to hold their temper so much better. Some don't use any cacao butter while others I can tell by texture use quite a bit.
I use these big blobs or "brains" I call them for seeds, I use them over and over but they are all white and flake apart when I put pressure on them... Is it because they aren’t in perfect temper why the resulting chocolate isn't coming out and holding that glossy black temper for a long time?
I just notice it gets a slight white film on it after a few weeks and the texture gets a tad funky..
Just so you know I am also using the temper 1 setting, so seed out at 90F and molding at 88.7F and then in the fridge to harden.
Should I be using the temper 2 setting where it drops it down and then back up to 88.7? Since the quality of my seed is pretty shit? Just figured I would ask. I am going to experiment as I just read through your illustration of tempering (great job by the way, the best most clear description I have seen yet)
If I just let the chocolate sit at room temperature it comes out really streaky and white
I figured 74F is just too warm, but based on your illustration it seems the temper might be off?
OK, tempering troubleshooting it is today.
For those not sure what is going on here, the method here is a mixture of a way I found works under certain conditions and using a tempering machine with seed. You can read the whole method here. http://chocolatealchemy.com/illustrated-tempering/
It entails using freshly crystallized chocolate as seed for tempering. Go read it. I won’t bore you here repeat it all.
Your issue appears to be that you have combined methods and are storing and using old bloomed chocolate instead of the freshly solidified chocolate that I call for. That is clear, aside from you saying it of course, is because it is white and crumbly. Forget “not perfect temper”. These are fully bloomed and devoid of any temper. Just because you call it seed does not seed it make.
The key to making my method work is that the seed portion that you use must be relatively fresh. In this state, there is a lot of Type V crystals. When you put this into your melted chocolate at 90-95 F, all the other types melt and you are left with a substantial quantity of Type V that acts as real seed and you get a good strong temper.
In old bloomed chocolate the amount of Type V has gone down significantly. As bloomed chocolate ages, there is solid state conversion. Type V converts to both IV and VI under certain conditions and this most likely is what is causing your issue. Those blob/brains are your indicator that your have Type VI. The Type VI melts at even a higher temperature than Type V, so there is no way to get rid of it without destroying your remaining Type V also.
I can’t really speak for your tempering machine’s settings as I don’t know them. Regardless, going down to 80 and back up won’t fix your issue if you are using Type VI contaminated seed unless you go all the way up to 100 f and then back down, which negates the whole reason for seed.
My recommendation then is to toss your crumbly not-seed chocolate and start fresh. And after that, instead of using this current method, there is no reason not to just reserve a bar of well tempered chocolate as your new seed.
Level: Apprentice
Reading time: 10 min
I am struggling making my 70% chocolate with only two ingredients. It seems like what I should do but it is really thick and hard to work with. It blooms really badly. What am I doing wrong?
Why are you not adding a little cocoa butter?
I mostly keep my head down in social media but I’ve heard through various grapevines that two ingredient chocolate is becoming a *thing*. And I completely do not understand it. It is talked about like it is superior or the maker is superior for using only two ingredients.
I guess I am going to soap box here a little, and I don’t mean to offend anyone in particular. Just take it as my musings on the subject.
It seems maybe this is where you are getting the idea you should be using only two ingredients. Cocoa beans and sugar I assume. Trying to suss out why, people toss out phrases extolling the purity of flavor or staying true to the cacao or other such nebulous statements. At the end of the day, it feels like marketing. A way to set themselves out from the crowd. Ok I guess.
If that is what you like, by all means make it. But I caution the thinking that using only two ingredients is in inherently better. By what metric? Sure. Few people want to eat a chocolate with 27 ingredients where 95% of them are chemical names. But once you are out of that mindset, I don’t truly get how 2 is better than 3 or 4. Why not 1 ingredient?
But to my way of thinking, it is some kind of pendulum reaction to 27 ingredient chocolate product. That if that is considered inferior (no real argument there) then the absolute bare minimum must be the best. This is the same logic that raw chocolate folks make. Over roasting is bad, so no roasting is best. That’s bad logic and the world does not work that way. Too much food (obesity) is bad so no food is best? Really? It is the same logic and makes as much sense. None.
Going back to metrics and why two ingredients are better I would propose these two metrics for consideration.
1) Adding a little cocoa butter (2-3%) to you chocolate can actually enhance the perceived flavor of the chocolate. It does this by allowing the chocolate to dissolve faster in your mouth, creating the sense of more flavor. You are familiar with this phenomenon in regards to sugar. Which seems sweeter? Rock candy or granulated sugar? Both are 100% sugar, but the granulated seems sweeter since it can dissolve faster.
2) Two ingredient chocolate can be thicker, and more temperamental to temper. How does this make it better? It doesn’t.
It is also worth noting that in conversations with supposed two ingredient makers, well over half say they used *a little* cocoa butter in their melangers to make life easier…..which suddenly sounds like 3 ingredient chocolate to me. This more than anything makes me think they are just playing a marketing game and that it really doesn’t matter.
That all said, let’s see if I can help.
First off, I am going to recommend you reconsider why you want to use only 2 ingredients. Put aside what you see other people doing. Keep in mind that that two ingredient chocolate you tasted and love *may* contain extra cocoa butter. Evaluate the chocolate you are making for what it is. Did you actually try making it with a little extra cocoa butter and if so, did you like it better without added cocoa butter? And why didn’t you make 1 ingredient chocolate if you wanted to *pure* cacao flavor?
Seriously, this is about what you like and enjoy. And that means the process too. If you can’t temper it because it is so thick, and it blooms, and you didn’t like the chalky texture, just how did you improve the experience and/or final product by keeping it *pure*?
Ok. I was going to offer help. I have heard that people have had difficulty with Tien Giang being especially thick. So I roasted 6 lbs and divided it into 3 batches.
1) The control. 74% cocoa, 26% sugar.
2) Heated control
3) 20% vodka soak
Spring boarding off my success with the honey chocolate, I mixed in vodka 20% by weight into the roasted nibs. After soaking in for 2 days, I dried them in an oven for 2 hours at 150F. To make sure it was not just the heating that made any difference, I also heated an equal amount of roasted nibs the same way. My hypothesis here was that moisture was causing the extra thickness and that by reducing that moisture, I could reduce the viscosity.
The final results were everything I hoped they would be.
1) This was thick and very hard to work with.
2) This was thinner and easier to work with.
3) This was the thinnest of the three.
The extra drying helped significantly to dry out the nibs, even though they had been previously roasted. In many cases I think this might be all you need to do if you insist on only 2 ingredients.
The vodka really helped to pull out extra moisture. I took weight measurements before and after drying and out of 740 grams of nibs, the heated control lost 5 grams of water, and the vodka treated lost 12 grams.
And the flavors were basically the same.
Alternatively, 3% cocoa butter reduces the viscosity nicely and if you are not allergic, 0.5% lecithin will very nicely bind with the water and make the chocolate easier to work with. And to my tastes, they all taste just as *pure* and true to the cocoa’s potential. Your mileage may vary.
If you have not guessed, I lean toward solid data and rigorous evaluation. Don’t follow a path because everyone else is. Make what you like and be honest about it and challenge your per-conceived notions. Maybe they will be right….but maybe you will find there was a heavy placebo effect going on and that 2 ingredient chocolate isn’t anything particular special.
Chocolate you made yourself. That’s special.
Do you have any videos showing how to make chocolate? I’ve looked all over and can’t find them.
I was just going over with my a member of my team how to announce our video series. Thank you for the absolutely perfect introduction.
Yep, you heard it right. We have videos on the way.
I’m going to go into full self deprecation mode and say that although they hopefully will do the job, they are not as polished and smooth as I might want. And in pretty classic Alchemist fashion, noting that I often communicate in great walls of text, I talk a lot in these videos. No. Really. A lot. So here is the official announcement:
For years I’ve been thinking that a video series on making chocolate would be a good complement to this site and to my weekly “Ask the Alchemist” series. Well, I finally got it done and today we are announcing the beginning of Video Tuesdays. Every Tuesday we’ll add a new video to our You Tube Channel until all 15 of them are posted. Think of it as an online correspondence course in how to make chocolate at home.
If you subscribe to the channel you’ll be alerted whenever a new video is posted. Today our first one is an overview of the Chocolate Making Process I’ve developed over the past 14 years.
There is the first video.
https://www.youtube.com/watch?v=fi2RY8zqy9g&list=PLy4KS4Q1T9sVHwqhdiand0d-1k6yzioJq
Eventually these will all live on our site as well as on You Tube, but we’re waiting until our site gets a facelift later this year (yep, more foreshadowing there).
The videos that are queued up are as follows:
Plus one on how to change the belt on the Spectra Melanger.
Enjoy. And please let me know what else you would like to see.
Level: Apprentice/Alchemist
Reading time: 13 min
How do I sweeten my chocolate with honey?
Sit back. It’s story time.
For years now I have not had an answer to this question. Or at least I didn’t have an encouraging answer. The best I could say was that you could not just pour it into your chocolate while in the melanger. If you do that the water in the honey will cause the chocolate to seize.
Over and over I’ve been told it was possible, but it was always via the classic friend of a friend. Or whoever told me had seen a *real* chocolate bar in the store sweetened with honey. In three separate cases I tracked down the makers of said honey chocolate. And in every single case they admitted, rather quietly and with their head lowered just a bit, that the chocolate just didn’t quite work well and that it was very difficult to remain stable. In 2 of the 3 cases all they did was stir honey into the chocolate during tempering, very gently so as not to cause a seizing reaction, and hoped for the best….and still had a high failure rate and shelf life issues due to the moisture.
For me this challenge had the same feel as my initial chocolate making endeavor back in 2003 when no one knew how to make chocolate at home. My goal then was to make real chocolate in a straight forward and approachable way. I wanted to do the same thing with honey. I wanted to come up with a way that anyone could do without hedging, and without admonishments to be careful.
Toward that goal, I have failed quite a bit. Failure is always an option. Let’s run down my list of failures.
The low hanging cacao fruit was powdered honey. The issue there turned out to be one of false advertising. I could find no real dried or powdered honey. It all contained huge amounts of dry sugar. There was enough to give a honey taste in teas and baked goods, but not what I was looking for. It’s is worth noting I did find one on-line but it was both horridly expensive and often out of stock. That in itself violated the goal of being straight forward and approachable to anyone. So I moved on. Failure.
I had this epiphany while making a batch of praline. Part of that procedure is to make caramelized sugar. You start off by making sugar syrup and then boiling the water off. I could find no good reason I could not boil off the water in honey.
It all went really well. It boiled. It hit hard crack temperature. I poured it up and it gave me a beautiful sheet of honey glass. And proceeded to suck up moisture fast and become tacky in the time it took to cool. Trying to powder it so I could use was a choir and by the end it was sticking together and in no shape to go into chocolate. Failure.
After that I decided it was time to step back and make it simpler so I tried to dry my own honey. I actually didn’t have high hopes here. AI tiny test confirmed that all you end up with upon dehydrating honey is something a bit akin to a taffy. Super thick but nothing you could add to chocolate. It forms a skin that keeps it from 100% drying out. Failure.
From there I jumped to coating a batch of roasted nibs in honey and drying those. I really thought I was onto something there. I had spread out the honey, radically increased the surface area and made the coating of honey so thin that it effectively could not form a skin.
After about 6 hours at 120 F the nibs were a tiny bit tacky. After cooling they firmed up and were crunchy. Looking good! I had previously weighted my nibs and honey and when the weight showed I had lost the 16% of the weight of the honey (the average moisture content of honey) I called it done.
I put the honeyed nibs into the melanger. I put some warmed cocoa butter and a little lecithin in just to help things along. After an hour they were all in and while not looking perfect, didn’t look too bad. Unfortunately somewhere between 1 and 24 hours disaster struck. What I came back to is virtually impossible to describe. But I will try. The melanger was still running. But it looked so very weird. It was bumping and thumping and splashing in ways it was not supposed to. Somehow, from the best I can tell, the honey started sticking to itself as it worked. There were globs of hard honey all over the sides of the bowl, the bottom of the bowl and there was this utterly bizarre ring of …..something…..around the central shaft. From the best I could tell it was wax or at least wax based. Pretty flavorless, kind of hard, but not really. It took me two days of hot water, repeatedly scrubbing and lots of elbow grease to get it clean. Oh, and the chocolate? Nasty. You know that odd flavor after you have chewed up all the flavor out of a piece of honeycomb? That! Failure.
But it’s funny. I have this streak in me that refuses to give up as long as what I am trying doesn’t go off and break physical laws. No perpetual machine tests for me! So I kept thinking, letting the idea rest and turn over in my mind. A few months later I was doing another test and had great success. It was not a honey test, but it was the key. I was playing with infusing some whisky with cocoa, noticed how much liquid the nibs soaked up and wondered what would happen if I went the other way.
I proceeded to add a small amount of bourbon to some roasted nibs. After 12 hours there was no bourbon left. I put the bourbon nibs into the oven and an hour later I was back at my original weight of nibs. And the nibs were totally dry. I made chocolate with them (recipe later) and I had a lovely bourbon chocolate that behaved perfectly.
As I said, this was the key. I think most of you know I am a retired chemist. This got me thinking about sugar’s affinity for water (everything gets tacky), but also alcohol’s affinity for water. I wondered if I could use the later to out compete the former. I’m not going to delve too deep into theory but I will say water and ethanol forms a mixture that is called an azeotrope. This mixture contains about 5% water. And the key is that no matter how you heat it you cannot make that water go away. My thought was to use that characteristic to force the water out of the nibs. Basically by heating ethanol soaked nibs, when the ethanol evaporates/boils off it draws water out with it. That is why the bourbon whiskey worked. I wondered if I mixed honey and ethanol (vodka) I could force the same reaction.
I guess by now you know it worked or I would not be writing this. It worked fantastic.
I dissolved 250 grams of honey in 160 grams of vodka. There was some calculations behind the choice of that amount of vodka involving partial pressures of water/ethanolmixtures, but suffice it to say it worked and it might well be possible to use even less. It took heating the mixture to 122F/50C to getthe solution to go clear. After that I mixed it with the nibs and let them soak for a day. I dried them in an oven at 150 F (the lowest setting in my oven) and they dried right out. They had a pretty sheen on them and were crunchy, not sticky. After some hours they stuck together but broke easily apart again.
Hedging my bets I heated 10% cocoa butter and a teaspoon of lecithin, and made a batch of honey chocolate. This time there was nothing funny at all. After less than 1 hour it was looking like this:
https://www.instagram.com/p/BI5qAJ8AuNj/?taken-by=chocolatealchemy
And after 24 hours this:
https://www.instagram.com/p/BI8DgcXAtWp/?taken-by=chocolatealchemy
Success!
For those that want to follow along I started with 750 g of roasted nibs, 250 g of honey and 160 g of vodka for a total weight of 1160 g. If everything works like you want it to, you should end up with the 750 g of nibs plus the weight of the honey minus 16% water or 210 g for a total of 960 g. 100% of the vodka is gone. I ended up with 948 g. I count that a total success as the 16% was an estimate.
Given how thin the chocolate was I think I could have greatly reduced the cocoa butter and/or lecithin amount. And it is very possible the amount of vodka would be also reduced now that I know what to look for. As I think about it I wonder if the vodka helped pull out extra moisture from the chocolate resulting in a thinner than standard chocolate. That might be worth looking into.
And the flavor? Here is the funny thing. I’m not a honey fan. It tastes of honey. I’m not a fan. But it tastes like I would expect honey chocolate to taste like. A little floral, a little tangy and a little back drop of comb and loam.
So there you go.
Honey chocolate.
Real honey chocolate.
Straight forward. No being delicate, no disclaimers, no conditions.
Pleasegive it a try and let me know how it works.
Level: Apprentice
Reading time: 4 min
I understand the no liquids rule, but I was wondering whether glycerin could work as sweetener? If it’s present in all natural fats, it shouldn’t be too much of a problem, no? I’m interested in its low glycemic index, and it seems ideal on paper. Is it possible or am I really off the mark?
When we talk about cocoa butter and tempering, you may often see the abbreviation TAG. This stands for Tri-Acyl-Glyceride. To translate that, Tri is three, acyl is a long chain hydrocarbon (the oil or fat) and the three Acyls are connected on a glyceride backbone. So, yes, glycerin is present in some form or another. But it usually is not in its free state. It likes to attach to thing, hence the TAG.
On its own it still likes to attach to things and therein is the first issue. By itself glycerin attracts water like a sponge. Glycerin is often added to lotions and cosmetics to help your skin hold onto moisture. Moving into potential TMA, when mixed into wax and used as a stool softener, glycerin’s moisture-attracting properties attract water from the body which stimulates….movement.
More in line with what we might use it for, it is often incorporated into fondants to help keep them supple, and certain filings to keep them creamy and soft. And as an additive to truffle filling it might be great.
I think you might be seeing the issue. If you were to put it into your chocolate, it may or may not seize. It would probably depend on how much water it had previously absorbed. But regardless would undoubtedly absorb moisture from the atmosphere and cause your chocolate to do really weird things.
It is also worth mentioning a few other things. With most any substance, there are going to be a small number of people that have sensitivities or allergies to glycerin and it can be an issue if consumed in large quantities. And it is worth noting that it is not calorie-free even though it is low on the glycemic index.. As a matter of fact, glycerin contains slightly more calories than sugar. Unfortunately it isn’t as sweet (about 60%) so you are going to need even more to get the same sweetness which is just going to compound the moisture issue.
And going back to the potential TMA, just as with sugar alcohols, consuming a lot of glycerin can produce a laxative effect which usually isn’t a thing most people look for in their chocolate.
So, here is a great example of ‘in theory it should work, but in practice it doesn’t’. Sorry. Good thinking though.
Level: Novice
Reading time: 10 min
I've tried to make "just add hot water" drinking chocolate. However I'm having two problems:
How could I improve these please? My basic recipe is:
27% sugar, 39% cocoa liquor, 9% cocoa butter, 24% milk powder, 0.7% vanilla, 0.3% sunflower lecithin
Also, how best can I imbue caramel flavour into a milk chocolate? I've tried caramelizing sugar, chopping it up and then conching it. But the caramelized sugar is super hygroscopic and also gets stuck in my conche. What else could I try please?
What you are running into are the preconceived notions of what and how hot chocolate should behave. What it seems you are used to with "just add hot water" is very significantly processed chocolate. I don't mean this negatively per se. Just that you are not seeing the massive amount of work that went into making a product that will dissolve virtually instantly for the American consumer market.
My very first thought on 1) is "that sounds about right". Chocolate is oil based and you trying to dissolve in a water. It would be exactly the same if you were surprised if you lightly stirred an egg yolk and cup of oil together and didn't get mayonnaise. It takes a very specific set of conditions to get oil and water to mix and be stable.....as you are seeing.
Now that I've said that, what I have had some success with is making a ganache with my chocolate and then mixing that into water. If you combine chocolate and water (or cream) at approximately 1:1 at 100F, rather gently, then let it set up, you may well find a spoonful of that then dissolves much easier into hot water without all the stirring and blobs at the bottom. Basically you have made an emulsion. Just like mayonnaise.
Your second item is playing right into the first issue. Let's go back to the egg yolk and oil. If you just mix the two together, it would look watery and thin. Certainly not creamy, yet mayonnaise is creamy. It's the emulsion that is giving it its creamy texture. Again, there is quite a bit added to instant hot chocolates to give them their creamy mouth feel instantly. Quite often guar gum, gelatin, modified starches, and the like. Basically a ton of food chemistry to get the mixture to behave smoothly and easily.
On to the advice now. Where you are going to find success is developing your technique. Basically, it is a variation of the ganache prepared on the spot. Have a look at both of these.
http://zoomyummy.com/2010/11/11/hot-chocolate/
http://www.wellplated.com/two-ingredient-homemade-hot-chocolate/
In short, I kind of hate to tell you, is that you have to give up the idea that you can have both an instant hot chocolate and one that didn't take time to prepare. It's sort of like a magic trick. You are used to only seeing the final trick - Ta-da! just add water hot chocolate - without realizing how much behind the scenes work there is to pull it off. i.e. pulling out a pan, heating everything just so, so that you form a nice thick, creamy emulsion.
As for the caramel flavor. I don't have a surefire answer for you. I can give you hints, but just like the above magic trick references, it isn't as easy as adding caramel to your chocolate as you have found. What I've found is you need to create it in the chocolate. Using high acid beans and elevated refining temperatures greatly increase the amount of caramel flavor in chocolate.
The hands down most caramel chocolate I ever tasted in a milk chocolate was from a Madagascar. In this particular case the 20% cocoa butter had been pressed (using the Nutrachef Oil press) from the same Madagascar beans used to make the chocolate. It resulted in a deep caramel flavor.
It is also worth pointing out you want a full fat spray dried milk powder. The process itself adds caramel notes. That’s one of the main reasons I offer the milk powder that I do. Non-fat milk powder just doesn’t seem to do it.
And I should clarify. Do you want the caramel flavor in your chocolate or in your hot chocolate? Making your own caramel syrup is the direction I would go if you want it in your hot chocolate. Basically, caramelize the sugar as you did before, but then immediately dilute it with hot water. This spells it out:
http://www.copykat.com/2015/01/19/caramel-syrup-for-coffee/
Prepare your own homemade caramel syrup for coffee (or chocolate) from scratch. It's easy to do.
Ingredients
- 1 cup sugar
- 1 cup boiling water
Instructions
Heat sugar over medium high heat until it begins to melt. Stir constantly. If the sugar begins to burn, discard, and try again. When the sugar begins to brown quickly stir in boiling water. Stand back, as the mixture may steam. Stir until well blended. Cook mixture for an additional 15 to 30 seconds. Do not let the sugar burn. Remove pot from heat source, and allow mixture to cool before placing in an air tight container.
That you can even add to your ganache as the liquid portion and the sugar content will both help it keep longer (ganache is perishable when made fresh) and allow the mixture to incorporate more water or milk to turn into hot chocolate.
I hope that helps.
Level: Novice
Reading time: 5 min
I’m considering creating a bean to bar chocolate shop. My reading so far indicates I’ve got a lot of reading to do. Good thing I’m not planning on starting it for about 18 months.
Other than Chocolate Alchemy.com and The chocolate life, what other resources & references can you recommend? I’ve quickly read through all your ‘ask the alchemist’ questions and didn’t see this one, or even similar.
Amazon seems to recommend Chocolate, Cocoa and Confectionery: Science and Technology 3rd Edition by Bernard Minifie and The Science of Chocolate 2nd Edition by Stephen T Beckett as decent books. If maybe a little heavy (especially the first one).
You have a good hand on a place to start. The two sites are invaluable and both of the books you mention are on my shelf. I particularly like Beckett’s book. In both though my take is that they are probably of limited value in the sense that my college text books are not useful to me right now on an active basis. They lay down quite a bit of fundamental information that I know and is worth knowing but do not particularly think about, but instead inform how I approach problems, issues and troubleshooting advice.
Reading them comes with a caveat that I hint at. I don’t think you should be reading them for the sake of implementing what is in them fully. My lasting memory of both is that they are geared for large production consistency and dealing with less than optimal cocoa beans. Basically they discuss using what was generally available when they were first written and on a very large scale.
As you say, they are a bit heavy. Industrial practices can be a bit heavy. And if you are opening a bean to bar shop, it isn’t really your world. And I suspect, you don’t want it to be. But it is good information you should have in your quiver of knowledge.
There are three other books that I think are worth looking at.
You used the phrase bean to bar, and that in the strictest sense may indeed be what you mean exactly. Stopping at the bar form. Those three books delve into chocolate confections and presentation of chocolate that is very appealing to many (read many customers). Again, good information and techniques to have. Maybe upon reading and experimenting with them you will discover you want to do more than bean to bar. Not that you have to, but again, it’s another arrow of knowledge.
Right now there is no book detailing the artisan bean to bar method. It is on my much too large to do list. But it is all on the site (and one thing that is chewing up time right now are videos and a site overhaul to make that information more accessible).
After all that, the other direction to take is just getting in there and making chocolate. You have to learn what you like and what you do not like and no book will tell you that. The heavy industrial books aim toward good and consistent which given the quality of beans now available and your smallish batches should be a pretty low bar. They don’t discuss how to make a bean more or less fruity or earthy or piquant. That is what you have to discover based on your tastes and the equipment you choose.
So that is it. Pretty short this week. In effect, go read and treat what you read as text book reading. Build your base of knowledge. Pick what works for you but don’t feel there is only one right way because there isn’t. Hopefully you have a passion for experimenting and learning as that will serve you very well.
Level: Novice
Reading time: 5-15 min (depending on how you follow maths)
I have a batch of 75% chocolate running. 70% cocoa nibs, 5% cocoa butter, the rest sugar. I want to make it 80% by adding cocoa butter. I started with 85 oz of nibs. Can I just add the same amount of cocoa butter again?
Sadly, no you can’t. But let’s run through the maths if you were to add that amount of cocoa butter and then how much you actually need to add.
It goes like this.
First I need to find out how much total chocolate you have so I can know how much cocoa butter you added.
T / 85 = 0.7 Rearrange that to:
T = 85 / 0.7 = 121.43 oz total chocolate
With that, I can get how much sugar.
121.43 * 0.25 = 30.36 oz sugar.
So you have
85 + 30.36 + 6.07 = 121.43 oz
If you add 6.07 oz more cocoa butter it is now
85 + 30.36 + 6.07+ 6.07 = 127.5 oz total chocolate
To find the new cocoa butter percent it is
(6.07+6.07) / 127.5 = 9.52%
The new chocolate total percent is:
(85 + 6.07 + 6.07) / 127.5 = 76.2%
Not 80%, even though the cocoa butter is near 10% as the new total is higher. The cocoa nib portion has dropped from 70% to 66.6%.
85 / 127.5 = 0.666 = 66.6 %
If you want to actually make it 80% you have to pull out algebra again.
0.8 = (85+6.07+x) / (121.43+x)
0.8 (121.43 + x) = 85 + 6.07 + x
97.144 + 0.8x = 91.07 + x
97.144 - 91.07 = x - 0.8x
6.074 = 0.2x
x = 30.37 oz
So, you make it all the way to an 80% bar with only adding cocoa butter you have to add a whopping 30.37 oz as:
(85 + 6.07 + 30.37) / (121.43 + 30.37) =0.8 = 80%
You didn’t ask, but I would add more cocoa nibs and/or a mixture of cocoa butter. Just for fun, let’s run through the maths involved in making it 75% cocoa nibs, 5% cocoa butter still, and sugar from your existing batch.
I’m going to take this in another direction calculation wise since we know how much sugar we have and don’t have to change it.
S = 30.6
We have decided it will be 20%, so we can get the new total from this:
30.6 / T = 0.2
T = 30.6 / 0.2 = 153
With that in hand, we can find out how much cocoa nib we need.
153 * 0.75 = 114.75
And since we had 85 oz:
114.75 – 85 = 27.75 oz cocoa nibs
We can do the same thing with the cocoa butter:
153 * 0.05 = 7.65
7.65 – 6.07 = 1.58 oz cocoa butter.
The main downside to this option is you have to refine your chocolate further.
Either way, there is the maths. I hope that helps.
Level: Novice
Read time: 5 minutes
When I peruse through your selection of cocoa beans for sale, the stark contrast in colors between the different origins always catches my eye. It's pretty interesting to look at for me. But then that's always made me wonder, have you standardized how you take the photo of each bean origin? As in, do you put the same mass of beans in the same container every time? Do you then use a tripod at a set distance away from the beans to take your shot? Is the lighting always consistent? Blah blah blah. The reason I ask is partly because of the motley colors I see, but also some of the origins simply look more attractive to me than others. I see some origins that are a beautiful consistent deep brown like the Madagascar. Then I see some origins that are really gray like the Honduras. The gray origins make me wonder if there's surface mold on those beans. Then I think if there's surface mold, what are those beans like on the inside? Other origins look multi-colored in the picture like the Mexican Chiapas. That makes me wonder if there's uneven fermentation in those beans or are those beans of mixed age or ??? I understand that you personally vet each origin you bring in and vouch for them. And I know you're not supposed to judge a book by it's cover, but for me some of the pictures may not be doing some of your origins much justice. Can you clue me in? Is there a similar story among gray-colored origins versus the multi-colored origins, etc?
Let’s put this on the table. I am a terrible photographer. So terrible that I should not even be allowed to use that term. I take pictures.
But to answer your question, I actually do my very best to standardize how I photograph the beans. They are all in the barrel I pack from, with a fill level near the top. The lighting is mostly the same, as is the distance. But I don’t use a tripod. For years I have known I should set up a white space so there are not shadows (I do know to keep my shadow out of the light source) but as of yet, I have not done it. Clearly.
At this point it is pretty much an ingrained rule for me to take photos of the beans as they come in. Nothing annoys me more than seeing the same repeated image when I am shopping for similar items. And I do my best never to do that. I also do my very best to capture the differences in the beans. Which it seems I am doing as per your comments. Again, there is little I find more annoying than misrepresentation of what is being sold. Some many years ago this slightly bit me when I reused an image of a previous crop year and although the image was of what I was selling, the new crop looked a bit different and some people objected to a small degree. Which I sympathized with. Which is why I now photograph each new bean.
Which brings me to how representative the beans are. Your comments actually reinforce my original statement that I am not a photographer. I think a photographer (a good photographer) does not so much take good photos, but captures what they see AND presents what they see. This is where I fall down. You mention the deep brown of Madagascar. This makes me cringe as to my eye it is a very solid red/brown. Auburn if that can be applied to non-hair colors. That is what I see. That is what I would like display. Likewise, when people visit, I show them the Honduras as the poster child of even and consistently colored beans without even the hint of mold. It’s almost crushing to hear some may think they are moldy. And then we have some beans like Rizek from the Dominica Republic. They look all over the board in the photo, but in person only show some pretty minor variation.
And I simply must address mold. I won’t sell moldy beans. What many people think of as mold is dried mucilage from the fermentation. Some is just crappy photography.
Recently I had two bags of beans arrive. One bag of great. The other was CLEARLY moldy (and not for sale). Not grey. Moldy! Have a look a what mold looks like.

On the other hand, here are two photos of Honduras. What is on the site (left) and how I personally think they look. Not moldy at all to me. The right photo is from my perspective more how they look.


Likewise, here is Madagascar. On the left is what I photographed. On the right is what (I think) is in my mind’s eye of what Madagascar looks like.


And the same goes for consistency. Sometimes lighting just magnifies subtle differences that when viewed in person are just not as stark. Let's do the Chiapas you mention. Left, again, as is, right what I think I see.

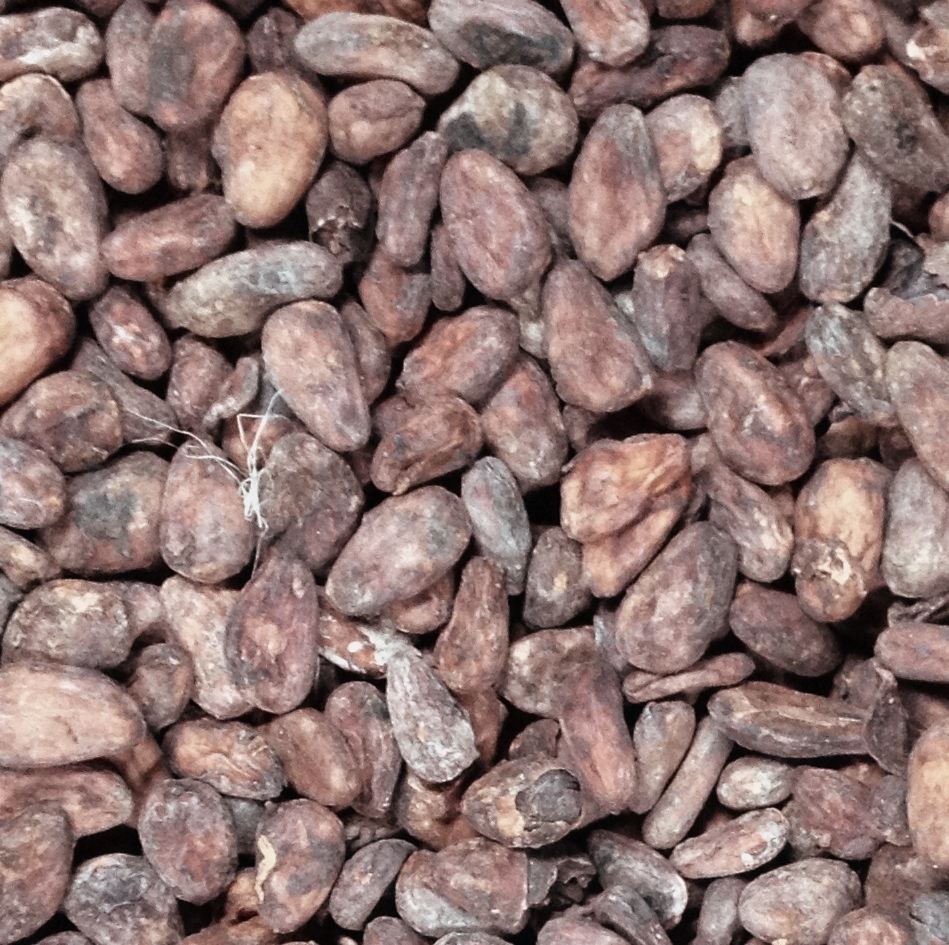
Is one more honest or representative than the other? Sure there is more variation than other beans, but when I look in the barrel I don't see the photo on the left.
It’s frustrating. And has been for years. I used try and adjust the color balance to what I saw….but I’m a ham fisted ogre there too and I made matters worse. And does it really matter that you think Madagascar is brown when I think it has a hue of red? I don’t think it does. Do you?
So now I shoot for basic consistency. And accept, for now, that you are right. Maybe I am not doing some of the beans justice. I point out time and again one should not judge a book by its cover (I’m glad you point that out too), try to write up really detailed tasting notes and paint a picture of senses, not just visually.
And at the end of the day, it mostly works. I’d rather be known for being straight shooting and earnest in my presentation of beans than being a photoshop wizard.
What are you thoughts on the matter?
Level: Alchemist
Read time: 6 minutes
I have been bowl tempering with good success until the ambient temperature in my kitchen went up. Typically in the morning when I temper the kitchen is about 60 degrees. We had some unusually hot weather and we have no air conditioning, so my kitchen was about 80. However, knowing this I took my liquid chocolate directly from the melanger, cooled it with a bowl of 65-degree water to 79 when it started to thicken, then immediately put it into a bowl of 100-degree water and slowly brought it up to 88. The molds then went immediately into a 45-degree refrigerator for 30 minutes, and then into my basement where the ambient temp is about 70. It’s with a bean, Bolivia, that I use a lot and my normal formula and melanging time. Yet the finished product had a soft temper. It was OK but I would not call it a full temper because it was softer than usual. It did not have the same snap and when you laid one bar on top of another it did not have that satisfying click. With this close control over my temperatures why did that 80-degree ambient temp have an effect on it, when the chocolate was not left at that temp at any time? (I even melted it down and re-tempered with the same result). Seems like I am not getting enough type 5 in there but can’t figure out why.
This is a really great question and I have to admit had me stumped for a little bit. You are correct, it sounds like everything should be working perfectly. Yet clearly it isn’t.
When I first read this I had an idea what it might be, but I needed to ask a few question In order to suss out.
It turned out that when it was not as hot, the molds hung out on the counter a little while since there was no rush to get them out of the heat.
This difference, the time on the counter, between going into the mold and chilling in the refrigerator, was the key.
Most of the time this time does not matter. But it can matter. Clearly. The problem was not so much that there was not enough Type V. It was that there was not enough time to allow it to do it’s job. By going from 88 F and a nominal amount of V, it was plunged straight into the equivalent of deep freeze. The Type V didn’t have time to do its job and propagate throughout the chocolate. Basically it was flash frozen. And the result was a soft temper.
Chocolate needs a little time for the Type V matrix to form. Just 5 or 10 minutes will often do the trick. At 80 F, as in this kitchen, it might have needed 15-20 minutes. The other alternative, which quite a number of chocolate makers use is to use a cooling cabinet. Those are cool, say 50-60 F, but not really cold. They give the Type V time to spread throughout.
In your case here I would have just taken the chocolate straight down to the basement where it was 70. Or alternatively, just left it in the 45 F refrigerator for 5-10 minutes. Not enough to flash freeze it as it were, but to take the edge off, get it cooling and crystalizing but not too fast.
And if you don’t have that 70 F basement, and the refrigerator is all you have, you may just need to wait out the heat. Chocolate can be a demanding and finicky lover.
So, in these warm days of summer, do keep that in mind. It’s still all about balance. You have to hit that Goldilocks zone. Get the chocolate chilling, but not too fast and not too long as you can have too much of a good thing.
Good luck and try to keep cool.
Level: Novice
Read time: 3 minutes
I am confused about the issue of “burning” or “scorching” chocolate. It is widely advised that when melting chocolate for tempering, one should not let it get above 120º F or else the chocolate will be irreparably damaged and will not be able to be tempered. However, while grinding in the melanger the chocolate gets up to 140º F to 160º F (the hotter being advised as a conching temperature). How come it is not damaged at this point but it will be if reheated/remelted later? I see some people talk about tempering straight from the melanger – which means essentially cooling from >140º F straight down to 84º F or so. Is there something about the chocolate cooling and “curing” after grinding, after which point it should not be brought above 120º but if tempered from these higher temperatures right away (without cooling first) it is OK? Any insight into this discrepancy would be appreciated. Thanks.
Nice observations. When faced with contradictory facts, the key is to tease apart which fact actually isn’t one.
In short this is a false fact from the days before home chocolate melting when people really didn’t know or believe they should gently heat chocolate. And what exactly it meant to heat chocolate gently. It seems like many people would put the chocolate in a pan, put the pan on the stove (on low of course) and proceed to burn the chocolate. How?
The issue wasn’t so much that the chocolate got to 120 F or 140 F or even 180 F, it was that the surface of the pan got much hotter. As in 400-500 F. And that is more than hot enough to burn chocolate. Now, if you constantly stirred, and mixed and kept that heat distributed, there wouldn’t be an issue. But people don’t tend to do that. They let it set….and burn that layer of chocolate that is setting on the bottom of the pan.
This is why it is pretty universally suggested that you melt chocolate in a double boiler. There is nothing magical here. It’s just that 212 F, the boiling point of water, is below the temperature at which chocolate will burn.
So feel free to heat your chocolate up. You can go beyond 120 F….if you do with properly. In a water bath. A warm oven does well too since the warm air has so little heat capacity. I often set my oven to 150-170 F and put much chocolate in there. It never burns and I don’t have to fret over water being near my chocolate.
That said, a variation of this is that you MUST heat your chocolate up to 120 F when tempering. This too is also untrue. It won’t hurt anything but it isn’t necessary. The though is that you have to take it that hot to destroy all the crystals in the chocolate do you get a good temper. As anyone who has messed up tempering by going to the mid 90’s know, all your crystals are fully melted at 100 F. Anything above that is just wasting time and energy.


