
This is actually a pair of articles. If you have read the first on that I wrote years ago, just skip on down the new new (2-6-08) illustrative section.
Deconstruction and Reconstruction
If you don't happen to know, the AlChemist here is also an actual Chemist. For a while now, tempering has been bothering me. Or more to the point, the lack of clear scientific information. Sure, there is a bit out there about the different forms of cocoa butter, and how you are forming a particular form (type V) that gives chocolate its characteristic snap and gloss. But there is still a lot of mystique, intrigue and lack of true explanation.
Well, after quite a bit of reading and thinking, I think I have both an explanation as to what is actually happening, step by step, in the tempering process and why it works. So, without further delay, this is what I have worked out, pieced together and tested. It has lead to what I think is a new way to temper, and it involves a piece of equipment you most likely have if you are making chocolate from scratch - the Santha Wet Grinder. And it is very simple - I have tested it a number of times and so far, it seems just about fool proof as long has you have a reasonably accurate thermometer. But I will get to that at the end. On to a little theory.
You may have heard how cocoa butter forms into various "polymorphs". Well, it is a simple enough term, but I can't say it is very approachable. Poly means many, morph means shapes. So cocoa butter can take on many shapes - and we don't mean in molds here. The molecular (there I go being unapproachable) form can take on many shapes. Think of a cocoa butter molecule as a long stick, not unlike a Lincoln log. There are LOTS of ways to stack them together and some are more stable and stronger than others. If you take the whole box and just dump them on the floor, you will get a very loose pile that is "soft". If you push on it, it is going to move. That is like "polymorph I". It is a very soft form of cocoa butter as there is very little structure to it. It is what you get if you just let the cocoa butter cool or cool it very quickly. I could go WAY into the analogy here, but suffice it to say, if you take your time, stack each log up and interlock it with the one below it, your whole structure is going to be strong and stable. That is "polymorph V" or tempered chocolate.
Now, I found the following chart. I really don't want you to read it to carefully as in my opinion there is just too much information there. I want you to look at the melting points - that is the key to what we are going to do.
Polymorphs of Cocoa Butter
melting point (�F/�C)
comments
form I
63.1/17.3
Produced by rapid cooling of melt. Successive polymorphs are then obtained sequentially by heating at 0.5 �C/min.
form II
73.9/23.3
Produced by cooling melt at 2 �C/min or rapid cooling of melt followed by storing from several minutes up to one hour at 0 �C. This form is stable at 0 �C for up to 5 hours.
form III
77.9/25.5
Produced by solidification of melt at 5-10 �C or transformation of form II by storing at 5-10 �C.
form IV
81.1/27.3
Produced by solidification of melt at 16-21 �C or transformation of form III by storing at 16-21 �C.
form V
92.8/33.8
Produced by tempering (cooling then reheating slightly while mixing). The most desirable form with good gloss, texture, and "snap".
form VI
97.7/36.3
The transformation of form V after spending 4 months at room temperature. Leads to the white, dusty appearance of "bloomed" chocolate.
What it all comes down to is that if you let cocoa butter just slowly and naturally cool, you are going to get a mixture of types I-V (no VI as it takes months). The slower you go, the more type V you are going to get as the others can't really form if the mixture is too hot - they just "melt". So at 30 C, about all that is going to form is type V. Now, notice I say "about". Those numbers are great in theory, but in practice, a little of all of them form at all temperatures - it is just one of those crystallization/equilibration theory "things" that I took 3 months in 2nd year Organic Chemistry to really study and understand.
So, if we take some melted chocolate (untempered - no structure at all), and let it cool slowly, type V "crystals" will start to form as it cools, then IV, then III, then II, then I. What have we gained - all we have is this mass of soft chocolate with all the forms. Yes and no. What we have is a soft mass with quite a lot of type V crystals "contaminated" by the other forms. What happens if we heat this back up to 32 C? All the forms except type V melt and we are left with what is effectively type V "seed" chocolate. If you then add this to a batch of untempered chocolate that is UNDER 92.8F/33.8 C (the melting point of type V), the cocoa butter present will start to form around the seed crystals very nicely and preferentially give you 90+% type V cocoa butter. There WILL be a little of the other forms present (that whole crystallization/equilibration theory "thing") but the majority will be type V and you will have tempered chocolate.
Now, I know in "classic" tempering you stir, and scrape, and sheer and yadda, yadda, yadda. If I did that in my Organic Chemistry lab while forming crystals I would have failed. It works sometimes, but mostly it is unpredictable (hrm, tempering unpredictable, naaaa). What I always learned was to form a seed crystal, set your conditions correctly, then TAKE YOUR HANDS OFF. So many people wanted to "help" the crystals form - all they did was break them and make a mess. So, based on all of that, this is what I have developed for tempering with your Santha. It looks more complicated than it is - I like to give plenty of detail.
The AlChemist approach to Tempering
- Refine your chocolate to the level you desire. Verify the temperature is above 110 F and remove anywhere from 1/4 -1/3 of the chocolate. (note, chocolate tends to equilibrate at this temperature when refining in the Santha)
- Place the chocolate on a plastic wrap covered plate, cover the plate and put it in the oven or other semi-insulated place to slowing cool. (you are forming all the crystal forms here, with an advantage to the type V by cooling slowly).
- Let the seed chocolate set up a few hours. It will be quite soft as it is "contaminated" by type I-IV crystals. Don't touch it, stir it or bother it - it knows what it is doing.
- Once it is solid and you are ready to temper and mold up, remove the seed chocolate and chop it up into small finger nail sized pieces.
- Verify the chocolate in the Santha is between 90-95 F. If colder, just run it a few minutes and it will heat up. If hotter, let it cool.
- Add it to the rest of your chocolate in the Santha, turn it on a minute or so to mix it, then turn it off so the seed chocolate can melt. This is the advantage of the Santha. It will distribute the seed chocolate very well.
- Turn the Santha back on and verify the temperature of the chocolate once it is all homogeneous. You want it technically anywhere over the melting point of type IV (81.1 F) and under the melting point of type V (92.8 F) . Practically, assuming your thermometer is not perfect, a goal of 88-90 F is nice. If it is a little too cool, turn the Santha on a little to heat it up. It really should not be too warm since you are adding room temperature seed chocolate to chocolate you have verified to be no warmer than 95 F.
- After everything is homogeneous, it is your choice how to withdrawn your chocolate. I prefer to turn the Santha off, withdraw a syringe (soon to be offered for sale) of chocolate, turn it back on, and fill my molds. Then repeat - off - fill - on - dispense. During this procedure I take off the nylon nut so the chocolate is mixing but not heating (no friction means no heat).
That is all there is to it. Finally a couple quick molding notes.
- Polish your molds with a clean dry towel.
- I found no advantage to rubbing with cocoa butter - it did not help nor harm the final release or gloss.
- Let the chocolate set up at room temperature - give the Type V crystals plenty of time to form. If you force cool, you run the risk of forming other forms and softening your chocolate.
- After the chocolate is fully set up, put them in the refrigerator 1/2 hour or longer, then unmold immediately. This really helps the chocolate release from the molds effortlessly by contracting it just a little.
Illustrated Tempering
Day in and day out, I try and make chocolate making at home approachable. And the one subject that always comes up is tempering. I have Deconstructed it (above), explained it this way and that way, and now I want to try to illustrate what is going on.
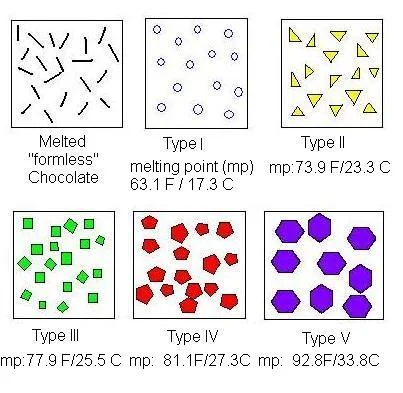
Please keep in mind, I have no clue what the various forms (Type I-V) actually look like at a molecular level or what form of crystal structure they actually take. The shapes (and colors) are for demonstration purposes only as a way to "show" what is going on when you temper your chocolate. Let's start with the legend so we all know what we are viewing.
The goal in tempering is to take either melted "formless" chocolate or untempered chocolate and make it into tempered chocolate, or chocolate with mostly Type V (pretty isn't it?) cocoa butter crystals.

That's the goal. How do we get there? We temper it of course, and the first step in tempering is to heat the chocolate over 100 F/ 37 C to destroy any and all crystal structure. A tabula rasa as it were.
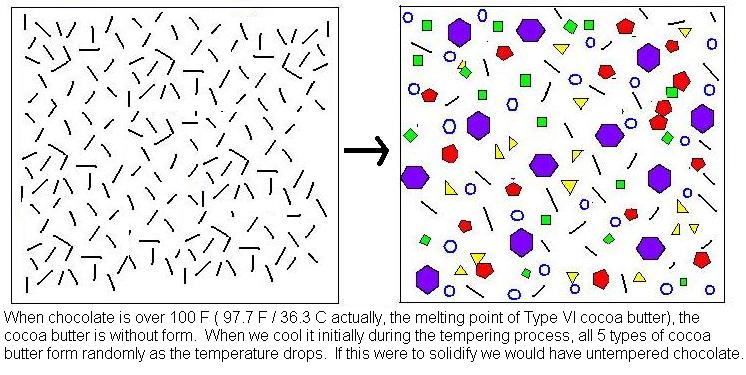
OK, are you with me so far? You heat the chocolate to destroy the cocoa butter crystals and then cool it to form all the types of crystals. This is the main part of tempering. The stirring or working on a marble slab or just waiting for it to cool in a bowl. This is what is happening when it cools.
Next you generally either add warm, reserved chocolate back to the cool chocolate to raise the temperature or if you are bowl tempering, you raise the entire contents. Why? Look and see. As you raise the temperature, each type of cocoa butter starts to "melt".
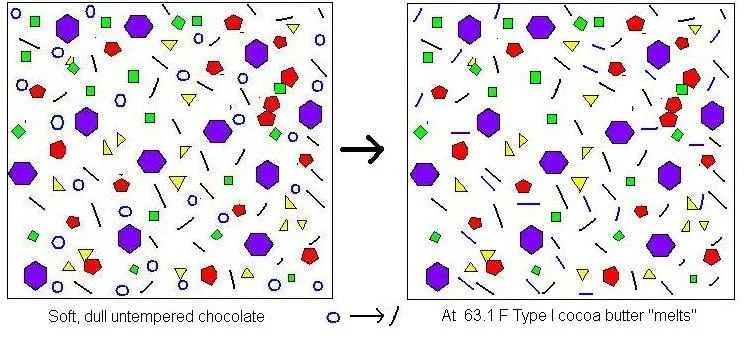
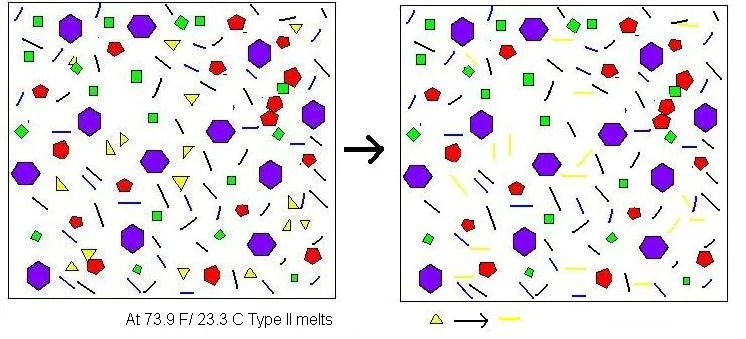
Now, most of the time you would never be at 63 F - it would be a hard block. Unless of course you follow my Deconstructed method where I let a portion of the chocolate completely set up overnight. But again, this is to demonstrate a point. So, we have heated the chocolate up past 63 F and look at that - all the type I crystals are gone. Just like magic (or maybe alchemy). Now we raise the temperature a bit more.
And a bit more...

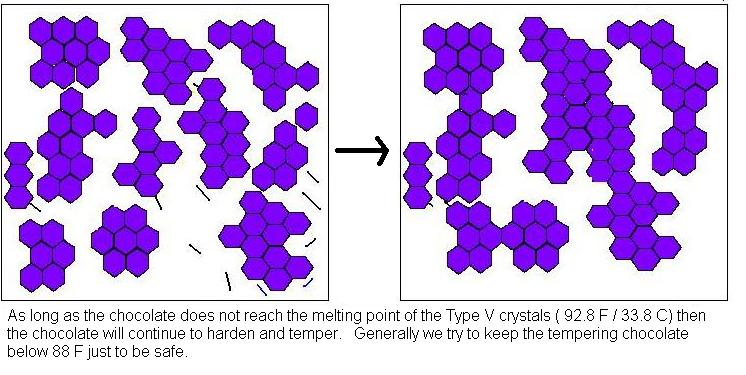
And a bit more heat still...


Being careful to not get the chocolate too hot. If we were to add more heat still and get over the limit they always warn you about (around 88 F), the type V would melt and we would be right back at the beginning. But that is worth pointing out - you would not actually be hurting anything. It would simply look like that formless chocolate. And also, as the note under the illustration says, we now have seeded chocolate. We have made it. All seeded chocolate is is formless chocolate (straight lines) with Type V (purple hexagons) crystals in it. Whether we make it as above or "seed" some formless chocolate with type V crystals (by adding some tempered chocolate to it {at the "proper" [read below 92 F/32 C, 88 F/30 C to be safe] temperature}) to it, the chocolate doesn't know the difference. In both cases we now have a form (the little seeds of type V) for the rest of the cocoa butter to form around as we cool the chocolate in its molds.

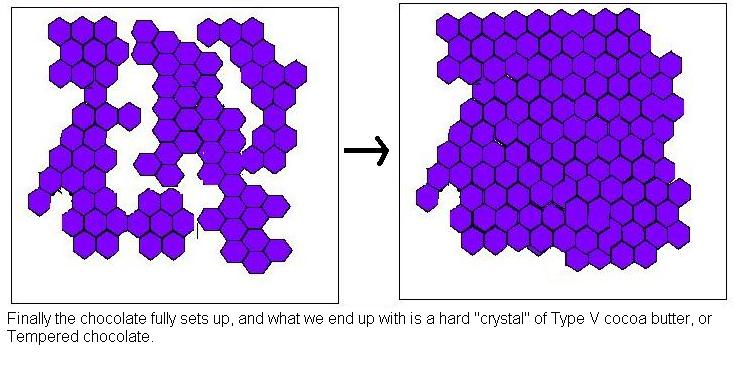
That's it. That's tempering. That's what's up with getting the chocolate hot (destroying all the crystals/shapes), cooling it down (creating all types I-V) and heating it a little back up (destroying all but type V).
One other disclaimer here. This is the "perfect" chocolate, more really, pure cocoa butter. Once you start adding other things (cocoa solids, milk, sugar, etc) the temperature ranges and melting points start to drop. This is why we only go to 88 F/31 C for dark chocolate, and even lower (84 F/ 30 C) for milk chocolate.
Questions?