
Ask the Alchemist #201
Read All The Articles In This Series:
Introduction to Profile Roasting (ATA #200)
The Drying Phase (ATA #201)
Relating Roasting Profiles to oven roasting (ATA #202)
The Development Phase (ATA #203)
The Finishing Phase and Ending the Roast (ATA 205)
Level: Apprentice
Reading Time: 13 minutes
Is testing the moisture level of the beans before roasting needed? I thought it may help cut back on the dry phase stage to insure you don't over roast. It's just I've seen coffee roasters do it.
To answer your question, no, you don't need to measure the moisture and if you follow what I am about to lay out there is no reason at all to cut back on the drying phase.
Last week I introduced Profile roasting, and the End of Roast (EOR) temperature and how it can affect the chocolate’s flavor. It is quite substantial as you saw.
Conversation from that article prompted today’s question and leads right into the other end of the roast profile; The Drying phase.
It isn’t anything fancy, but there are a few nuances that we will deal with.
The Drying phase is nothing more than the time it takes for the cocoa beans to go from room temperature to a surface temperature of 212 F.
I need to make something clear. 212 F is a mile post in the roast. I have labeled it as the end of the Drying phase. I am NOT saying either of these things:
· All the water is gone from the beans
· The beans are 212 F all the way through
We need a way to discuss profiles and different parts and the boiling point of water is a great place. It is a way for us to standardize the conversation. I also picked it because virtually nothing happens before that temperature during the roast. There are no real visual or aroma changes. On the other hand, somewhere from 212-220 F you can start to notice some things. Chemistry is happening and things are changing. You start to notice aromas.
Before we go any further, I’m going to present this to you.
The Drying phase does not much affect flavor.
That is a bold statement and there are ton of ways to prove it wrong.
If you follow a couple guidelines and basic limits you will find that it holds true though. And the really important thing is that I have found in no case does it improve the roast/flavor. It only makes it worse.
As long as your Drying phase is from 8 minutes to a 20 minutes I have found no difference in the resulting chocolate.
And really, since you are roasting in a properly sized and powered drum roaster you are going to be very hard pressed to have a faster or slower roast.
Basically don’t burn or bake. Everything else is golden.
Let’s talk about coffee roasting and over roasting and their drying phase.
This feels like an exception to prove a point.
Speaking also as a coffee roaster, I don’t believe that coffee roasters are cutting back their drying phase so as not to over roast. They have their own drying phase roast window, something on the order of 3 to 6 minutes. If you have a coffee roaster taking 8 minutes then the roaster (the machine) is probably underpowered and their entire profile is going to be a *bake* profile, leading to an over roasted, yet flat roast.
It isn’t the 8 minute drying phase that is the problem, it is the whole profile. When they adjust the profile to “cut back” on the drying phase, back into the 3-6 minute window they are also going to pull the other phases into compliance and the whole roast will improve without over roasting.
And this holds try for cocoa. If your drying phase is 30 minutes I can only assume it is that long because you can’t make it faster. If that is the case your Development and Finishing phases are also going to be quite long and you are certainly in the zone for mis-roasting your beans. But it has NOTHING to do with the fact that the drying phase was 22 minutes. It is because you could not get your other roasting segments into the time windows (that I will set out in coming weeks) needed for a good roast.
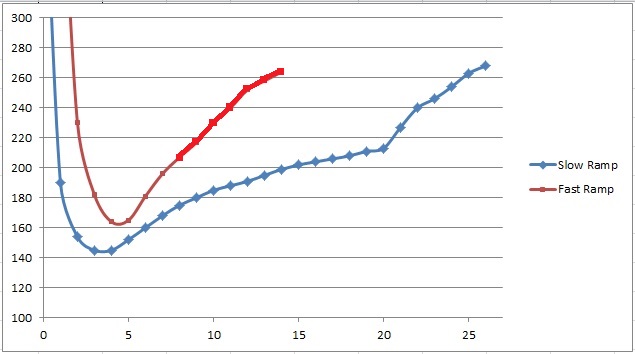
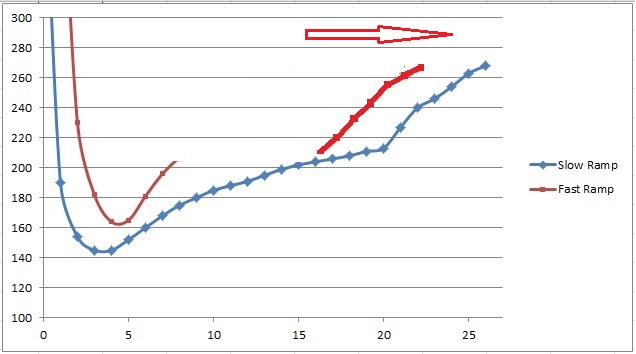
There is a little doubt there, I know. Have a look at these two profiles.

I know, it is hard to believe these are roast profiles produce the same chocolate. But they do. More than that, where it counts, they ARE THE SAME PROFILE. Sorry for yelling there, but I really want to drive that point home. Recall, the drying phase has no effect….so let’s get rid of it.

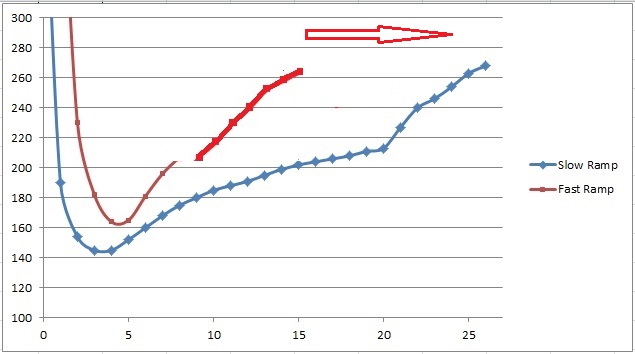
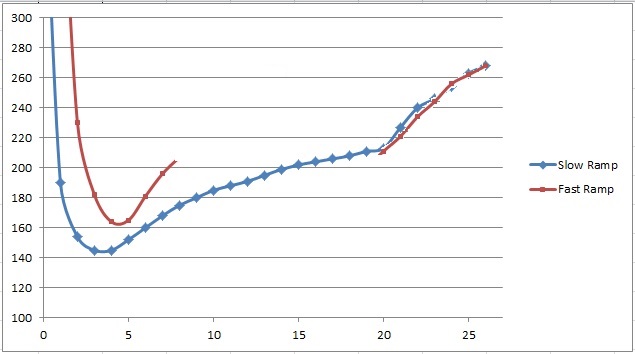
Look at that, without that pesky drying phase the two segments that matter (Development and Finishing) overlap perfectly.

And I want to remind you that this isn’t theoretical musings on my part. These are just one of many pairs of tests I made with different Drying phases but identical end segments. In multiple blind tastes they all tasted like the same chocolate.
“But how can I tell those are the same profile just from looking at the graph? They look so different”
Great question. You have to break the profiles into something meaningful you can use. I like ramps and elapsed times. Let me show you what I do.
What is the ramp? Well, you know really. You have ramps on highways and ramps you rode your bike on when you were a kid. They are ways up and onto something. The upward shape of the curve (after minute 3) is just a ramp. Let’s get a number from it.
You know that oft asked high school question “why do I have to take algebra? I’ll never use it!!!”. Well, not to scare you away but ramps are one of those practical uses of algebra. If that scares you, keep reading. No solving for x equations, I promise. There is a concept there you have to understand and it’s just like another one you use every day. MPH. Miles per hour.
In algebra, the ramp is called the slope of the line. In this case it is just how much the temperature went up compared to how long it took. Simple.
In the slow ramp above it took about 20 minutes for the beans to go from room temperature (70 F) to 212 F or a change (or delta) of 152 F. You ramp is just one divided by the other.
152 / 20 = 7.6 F/min.
The other ramp took 7.5 minutes
152 / 7.5 = 20.3 F/min
Why all of this? It is a way of communicating information that I will put together in a moment.
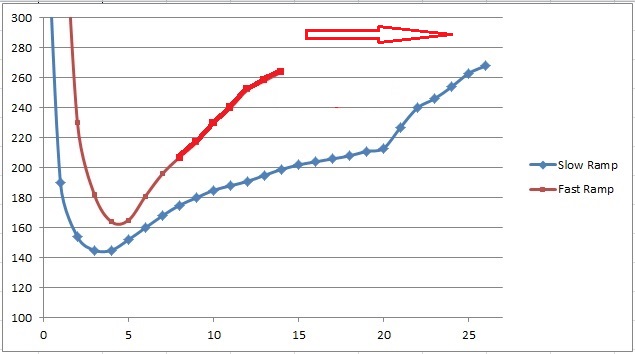
Let’s use this calculation to start to get a feel for what the other segments look like.
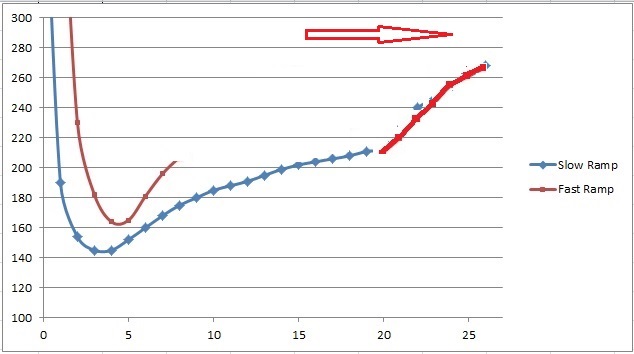
The slow ramp profile went from 212 F to 232 F in 2.25 minutes (21.25 – 19.5). 20 degrees in 2.25 minutes or 8.9 F/min.
The fast ramp did the same thing from 7.5 minute to 9.25 or 2.25 minutes. Again the same 8.9 F/min.
The last segments (the Finishing phase) again are the same 4.75 minutes to go up 36 F. That ramp is 7.6 F/min if you want to do the maths.
With all that we can now look at the profiles and see pretty clearly why they are the same.
We basically get rid of the drying phase, and the profiles are identical.
Now this isn’t to say the drying phase isn’t important. It is. But not in the way you think.
The drying phase is only important as a way to set up your roast so as can hit the Momentum phase with the ramp you want.
There is nothing fancy or esoteric. It’s just about control of your roaster.
Let’s take the slow profile.
The drying ramp is 7.6 F/min. The Development segment is 8.9 F/min.
That is hard to do in many roasters. That means pouring on the heat because I am going from a lower ramp to a higher ramp. It is exactly like trying to hit the top of a hill at 60 mph when you have been climbing it at 40 mph. It’s just that and nothing more.
On the other hand, the fast profile is humming along at 20.3 F/min and I need to slow down to 8.9 F/min. That is a breeze. I just tap the brake.
You are on the same hill doing 60 mph and want to crest at 40 mph. What do you do? You just back off the gas and let gravity and friction do the rest.
When do you take your foot off the gas? I can’t tell you but I bet you could tell me about your car. It all depends how much power it has, how heavy it is, etc. Driving a roaster is no different. In my Royal that roasts 25 lbs I vent a little heat about 208 F. It is big and burly and slows down easy. The Gourmia I might not slow down at all since it is so light. You have to adjust to the conditions of your roaster.
That said, I don’t use either of these the profiles since both were tricky to control, sort of like stunt driving…on wet ice. One I had to brake a lot, the other I had to pour on the gas
What I do is look at the ramp I need in the Development phase, and add a bit to it for the Drying phase.
In these the Development phase’s ramp is 8.9 F/min. Somewhere around 12 F/min is a comfortable speed to approach the top of that hill at. 12 F/min is my target Dry phase ramp. I use that number by noting I have to go from 70 F to 212 F or 142 F. Just divide that by the ramp I want:
142 / 12 = 11.8 minutes.
And 10-12 minutes at 212 F is exactly where I tend to aim toward.
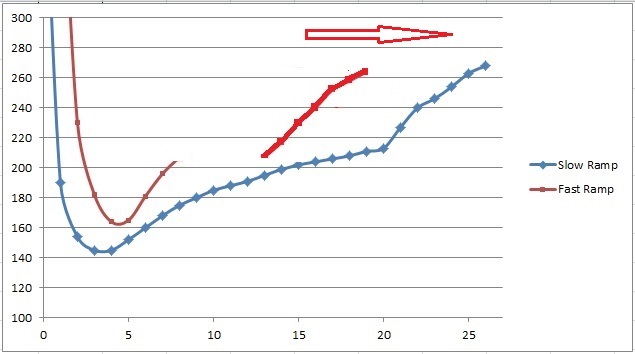
One final subtle note. Look at this spot on the Profile around 212 F
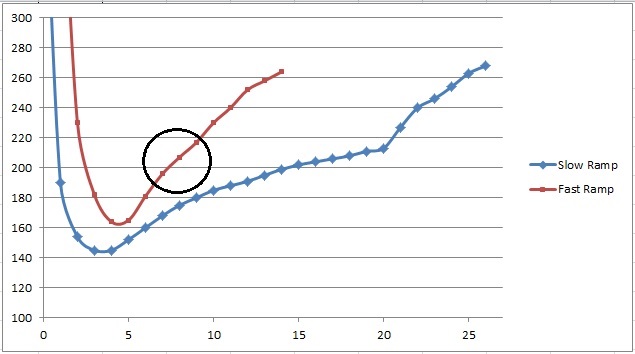
Do you see how the curve dips down just a little bit? I tend to view that as a sign of a roast in good control. It is showing the extra energy it takes to vaporize water out of the beans. Because energy is being used up as it were, it doesn’t go to increase the bean temperature so the ramp slows down.
If you don’t see it in your own roast don’t fret too much. You sometimes can’t see it if your ramp is too high or too low, but very often it is there at the Goldilocks point.
In summary, the Drying phase:
· Is defined as the time from bean introduction to 212 F/ 100 C
· Can be 8-20 minutes long. 10-12 is a great goal
· Its ramp should be slightly higher than the upcoming Momentum phase
· Ramp as fast as you can (it saves time and money) and still hit your next segment’s ramp properly.
· Pay attention to your drying phase as it is the foundation of repeatable profiles.
Next week I’m going to try and jump straight into the Momentum phase, how to control it, what it is for, etc.
And again let’s keep these conversations and questions coming. What did I miss? What was unclear? What do you want to know more about in future articles?
We all benefit from them. Thanks everyone.