Viewing entries in
Roasting

3 Comments

12th Night, tortes and the aztecs

How's that for a title? I celebrated 12th night last night (secular form actually) and for dessert I prepared a fresh Tabasco (bean of course) based flourless torte - just to die for.   I thought I would share both parts.

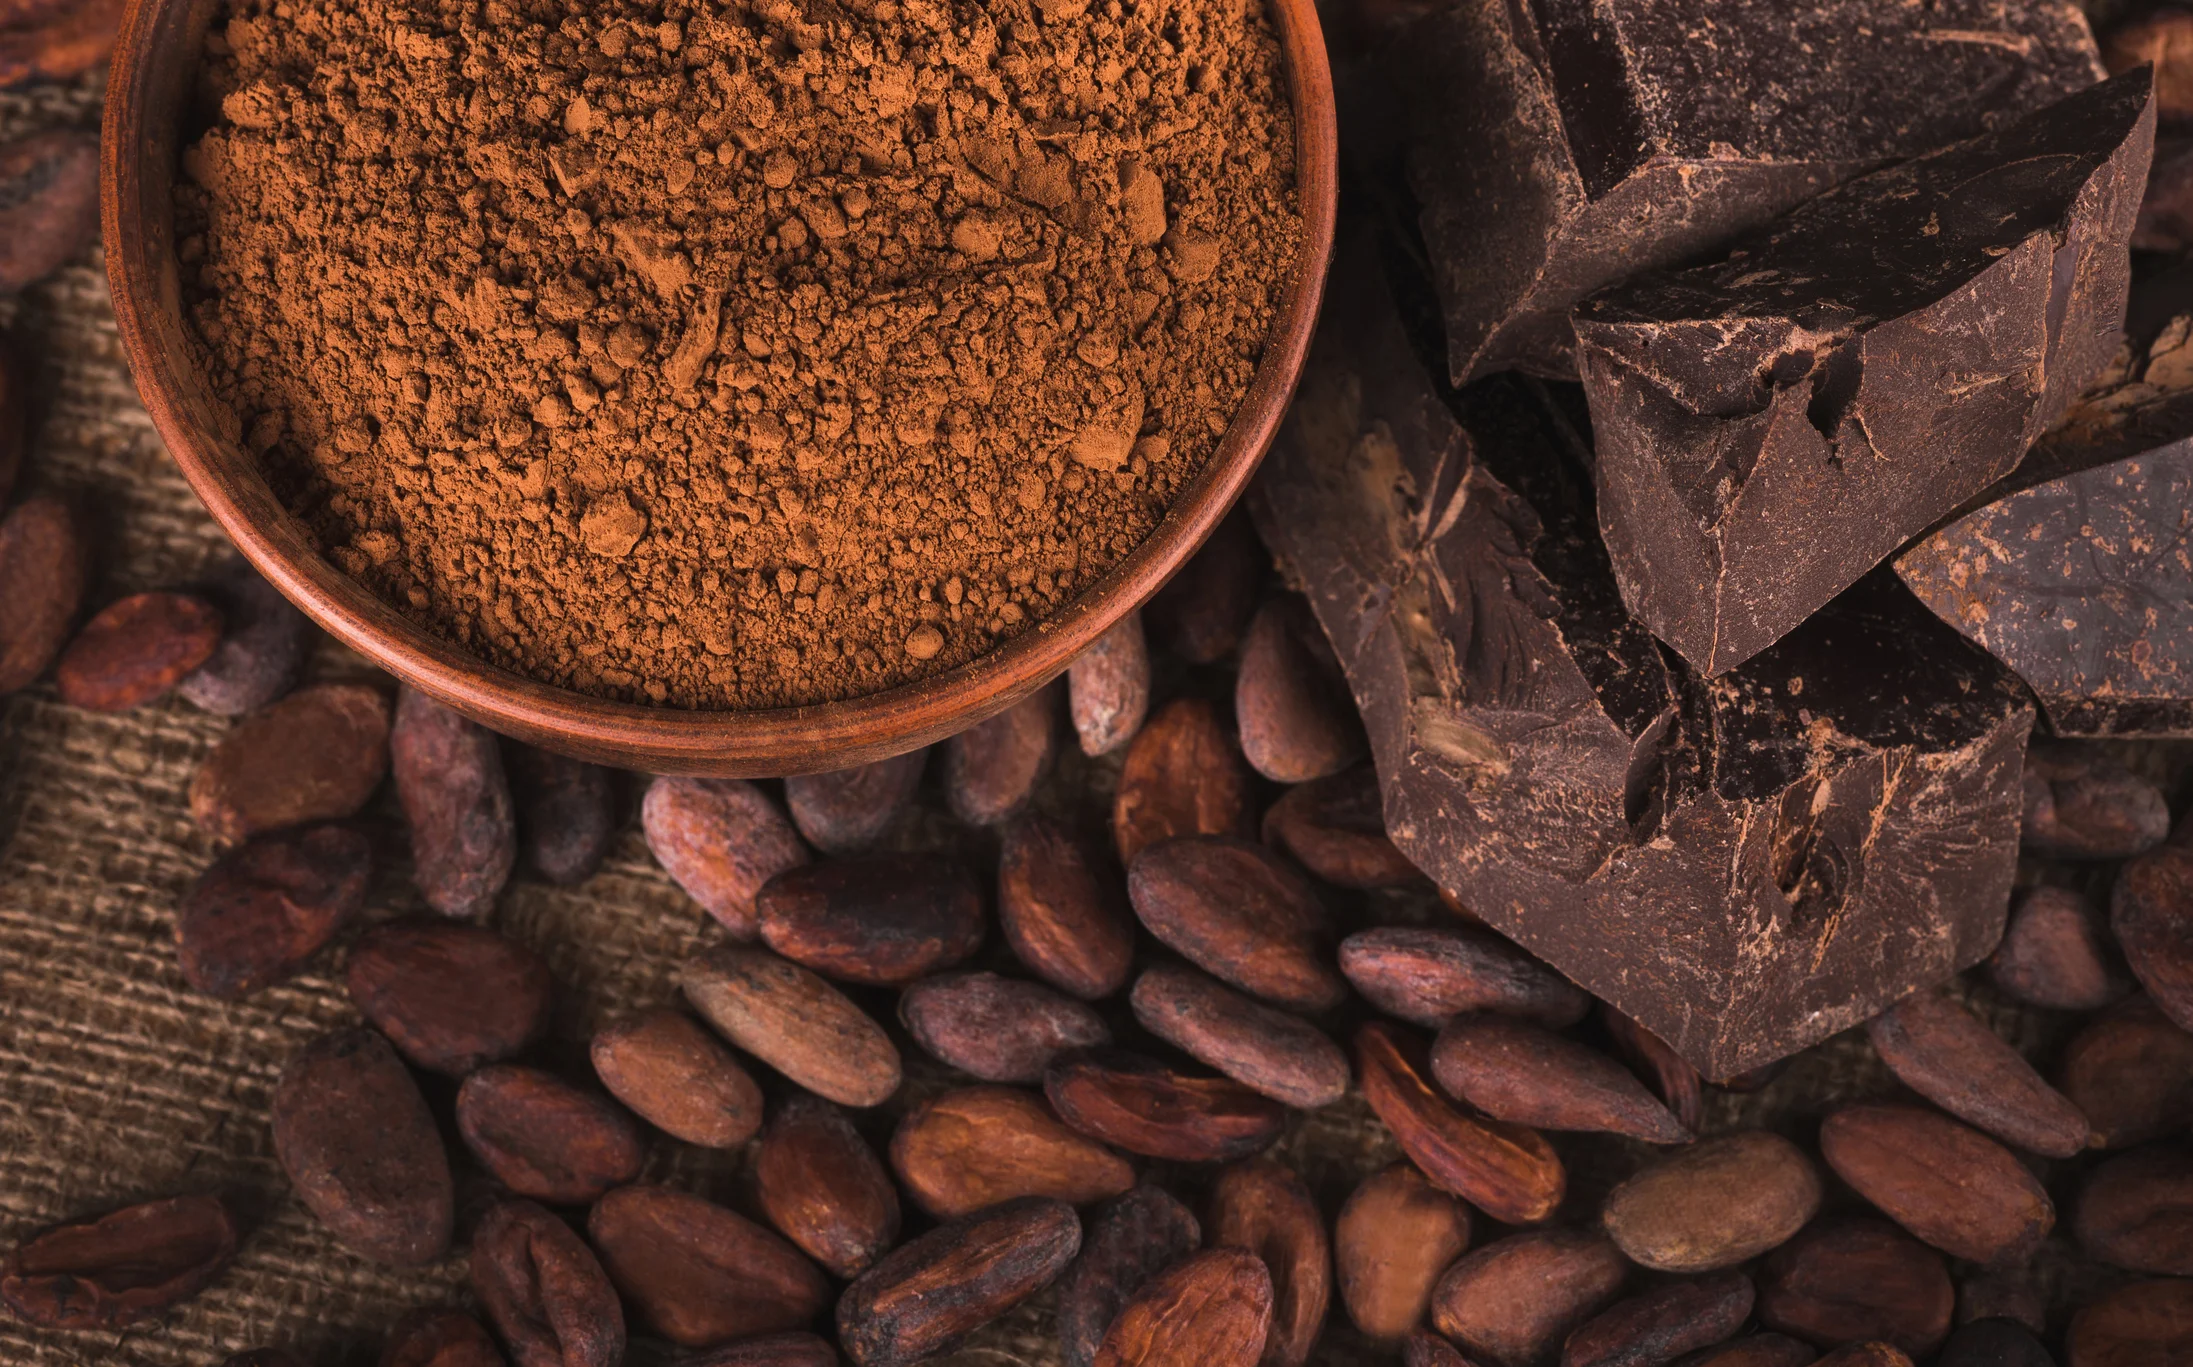
69% Dark Tabasco chocolate - 6.25 lbs 5 lbs of Tabasco cocoa

5 oz  Natural cocoa butter

30 oz unrefined cane sugar

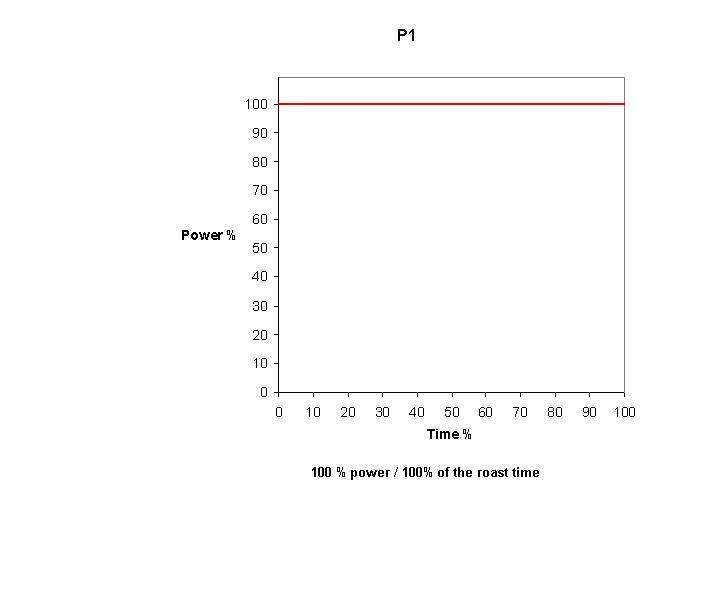
Roasted the Tabasco cocoa in two 2.5 lb batchs in the Behmor, Profile p1, 14 minutes roast time.  Cracked the cooled beans in my Cocoa Mill, winnowed them and ground them into liqueur in my Champion Juicer.  I melted my cocoa butter in the Melanger, added the Tabasco liqueur.  I did something I have never tried before which was a little elevated temperature refining.  I put the drum and contents in my oven until everything was 140F.  I heated my sugar to 180 F (and no, is doesn't melt).  I then started the Melanger running and added the sugar.  Brought the whole mass to 155 F.

Now, before you try this at home, I have an aluminum center mount for the wheels (the nylon gets brittle) and have replace the seal on my Melanger (don't ask why I had to do that) so I can take mine over the 150 limit.  If you want to try it, just go to 145 or so and all should be good.

In any case, the extra heat helped to drive off some of the acidity of the beans, but more importantly catalyzed some nice acid induces hydrolysis flavor reactions in the chocolate and really smoothed out the flavor and bumped up the complexity of the chocolate.  The temperature only stayed elevated for 4-5 hours.  I think 8-10 would have been better, but I will have to play with that more.  I considered the chocolate finished at 20 hours.

torte.jpg

The chocolate itself has some great liveliness and was deemed almost too sweet by some household tasters.  Says something for a nearly 70% dark chocolate.  I used 1 lb to make the following torte.

Chocolate Torte

1 lb 70% chocolate (homemade is best in my opinion)

2 cups sugar

2 cups butter

8 eggs

(If you like coffee, 6 oz of espresso can be added to the eggs for a Mocha torte)

Preheat  oven to 350 F.  For really even baking, make a 1" water bath with a 12" pan and get that also pre-heating. Pull your espresso and let cool if you want a Mocha torte.  Melt the butter and chocolate together.  Also let cool to room temperature. Butter and dust with cocoa powder a 9"  pan.  I find a springform or cheesecake (removable bottom) pan works well.

Whisk the eggs and sugar together.  Whisk in the espresso if desired.

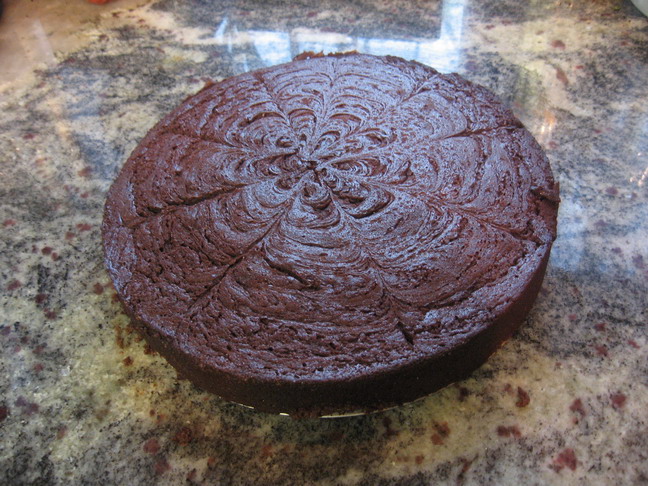
Fold in the cooled chocolate mixture (chocolate to eggs so you don't set the eggs).  The "batter" may well gel up - kind of odd, but ok and what allowed me to put the nice spiderweb pattern on the torte.

Pour into the prepared pan and put in the oven (in the waterbath if you are doing that).

Bake 45 minutes.  Edges will be set but the middle may jiggle a little.  It's ok.  Remove and let cool.

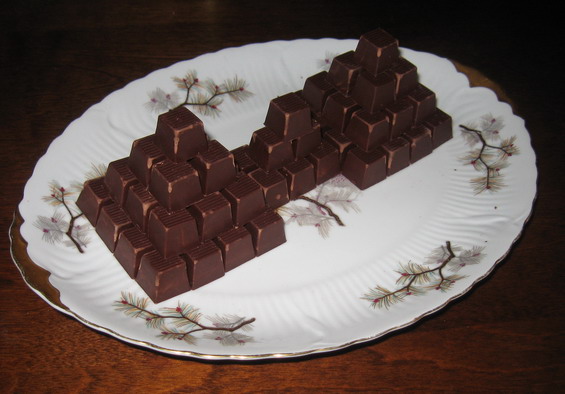
This supposedly serves 16. It is VERY rich.  I like it the next day best. The rest of the  chocolate we molded up.  I tested out a new mold.  It holds 72 0.2 oz chocolates.  I will be selling a limited amount of these.  Look for them in the next week or so.  Someone (thanks Jasmine) got creative as soon as they were out.

aztec.jpg

Our Ode to the Aztecs.

We just ran out of Ocumare, and are very low on the Papua New Guinea . But the new Panama should be in Wednesday, and available soon there after.

3 Comments

2 Comments

Behmor 1600 now in stock

Our stock of Behmor 1600's are now in stock and all pre-orders have been shipped out.  I opened up and tested a couple units and there were as expected.  They now have a new clasp on the drum that I like quite a bit.  Much more secure.  I will get a photo up this weekend. You will see two options.  A non-labeled USA model and a Canada model.  The ONLY difference is that I have included and defrayed  a little of the Canadian shipping costs for our friends up north.

A few notes and reminders.

  • 2 lbs is my recommended minimum.  Less than that and you run the risk of over roasting.
  • Don't forget to register your Behmor online with Behmor.com.  It's is how warranty information is tracked.
  • Don't forget to read your manual.  A lot of it is geared for coffee, but it has applicable information.  In particular, don't fail to do an initial "dry burn" before roasting for the first time and while you are not forgetting things, check the underside of the chaff tray for residual sealing plastic.  The factory sometimes leaves a bit and it smokes if you roast it.
  • Finally, there are a number of "warning" labels on the roaster that are meant to be removed before roasting.  The glue used sometimes is a little too good.  If it is still tacky after you take it off, a little nail polish remover does a good job of cleaning it up.

And as always, if you have any questions, please don't hesitate to ask.

2 Comments

3 Comments

Behmor 1600 almost here

We have word that the newest (and ONLY) cocoa roaster has landed. We should have our stock tomorrow and all pre-orders will go out a day after that. I want to open a couple up, try them out, kick the tires and make sure everything is just like the pre-production models I tested. Once I am happy I will take them off pre-order, and they will be fully available. In the mean time, we needed some more space, so this weekend was spent rearranging and building new shelves for the roasters and some other new upcoming products. shop2.jpg

By the way, that "thing" on top of the filing cabinet to the left is a Behmor in full "test" mode. I seem to have this thing about tearing equipment apart to know how it works. It's how to keep "on top" of things.

shop1.jpg

Oh, and yes, that is a Champion to the right. I use them too!

3 Comments

9 Comments

Behmor 1600 Gourmet Coffee AND COCOA Roaster

We have finally received word that the first production run Behmor 1600 has been completed and the first container is on the way. As a Distributor, we have been given permission to begin accepting pre-orders. If you wish to place the order, please do so only for only the Behmor or only for items you want to ship with the Behmor. The reason is that we will NOT charge your credit card until they arrive sometime in November, and double charging leaves too many places for error, and none of us want that. So anything you order with the Behmor will be placed on hold until they arrive.behmor5a.jpg

And now, a little background.... The Behmor is the brain and love child of Joe Behm. Some 8 years ago he had some fresh roasted coffee, was blown away and found that few good roasters were on the market. What do to? Build your own. So he did and what we have here is the result. A 1 lb coffee drum roaster. Now, coincidentally, I had been working on nearly the same thing, just many years later, i.e. I was attempting to put together a rotisserie convection oven that would roast cocoa. I was just coming to the conclusion that there was not a convection oven on the market that would do the job when I had the opportunity to test out a pre-production model of the Behmor 1600, with Joe Behm there.

Much to his horror (at the time), I loaded the drum nearly to capacity with cocoa beans, let it to the first of five settings (more on this below) and hit start. 20 minutes (and a crowd of people smell chocolate) later there were a few snaps and pops indicating the cocoa was done. I stopped the roast, pulled the beans and was very pleased with the results. Soon after I left with a Behmor 1600 to start testing extensively.

First off, as this is Chocolate Alchemy, I will be focusing on how the Behmor behaves for cocoa roasting, not coffee. For a ton on information on coffee roasting, and some different perspectives on how to use the Behmor, I would suggest this Wiki page. So, without further ado, go to Cocoa Roasting in the Behmor 1600.

9 Comments

1 Comment

Behmor 1600 for roasting cocoa

I have now been testing out the Behmor 1600 coffee roaster for about 3 weeks now. I tried out both coffee & cocoa and it is doing a good job. When it becomes available (end of August?) we should have units for sale. But before we get too far into how it performs, I should give you the basics. The Behmor 1600 is a screen drum based convection roaster for coffee. It has 5 preset temperature/time profiles depending on your own style and tastes. For coffee it can roast up to 1 lb of green coffee. And if that was all it could do (for $300) in cocoa, I probably would not be talking about it here. But since cocoa roasts so much lower than coffee, you can actually roast 2.5 lbs of cocoa (I think I will probably offer this increment) leaving you with about 2 lbs of nibs. The interior is nicely illuminated. You can easily see as the beans (cocoa) start to round and smooth out (an "end of roast" indicator). There is also an afterburner built into the system. You won't be needing it for cocoa, but it does an admirable (albeit not total) job of removing smoke when roasting coffee.

The five profiles that come pre-programmed are as follows. Keep in mind those temperatures are based on a pound of coffee. 2.5 lbs of cocoa keep those temperatures nearly 100-150 F lower - just right for cocoa roasting.

behmor-p1.JPGbehmor-p2.JPGbehmor-p3.JPG behmor-p4.JPGbehmor-p5.JPG

P1 is a just straight heat. It does get up to 350 (ambient) F, a little warm for some beans, but fine for more robust beans.

P2 I like the best so far. That high initial heat (good for bacteria kill) followed by a nice low heat to delicately roast the beans.

P3-5 work just fine in general. I will have to test them more before I can make any definitive statements.

And with all the profiles, you can of course stop and cool the roast at any point. You don't have to wait for the end of the profile. On a similar note, all the profiles have a maximum time limit (20-23 minutes I believe) which is more than adequate for any bean I have tested without the danger of burning or massively over roasting them.

1 Comment

2 Comments

Ocumare 2007

The new crop of Ocumare (a delicate Criollo from Venezuela) is in and available. If a few of you want to jump on it, there is a small window of opportunity to taste and compare both crops. There are a few pounds of the Ocumare 2006 left. I have set the limit to 1 pound so a number of people have the chance to compare them. I would expect the supply to be out in a day or so. On the other hand, I do still have some of the 2006 available as Roasted if you want to go that route. In general, the 2007 crop is a little fuller in flavor and in particular has a bit more of a chocolate profile than last years crop but not quite as bright.While I am listing some different beans don't forget about the Ecuador "Nacional". I just roasted some up this weekend and it has maintained a very nice balance of flavors. If anything it may well have improved.

And one other bean that seems to get ignored in light of some of the other really excellent beans is the Papua New Guinea. I know the review reads a little odd, and I really don't mean to drive people away from it. I just don't want people to be surprise by it. But hands down, every response I have received back from it have been positive if not glowing. Please give it a try before it runs out.

And I know there are a lot of people out there eating raw cocoa beans for their health effects.  I don't and won't claim particular health effect one way or the other (I really prefer the taste of roasted beans) but I did want to pass on this bit of information that I received  about the organic Madagascar we have.  It was lightly fermented about 5 days at temperatures not exceeding 120 F.   I have found this has been found to be quite acceptable to many people who follow a raw food diet/way of eating. Finally, I have what I consider some exciting news. There is soon to be (August?) a new drum coffee roaster on the market. How in the world does that affect us roasting cocoa? Well, I have been testing it (the Behmor 1600) for the last couple of weeks and it is doing a GREAT turnkey job roasting 2.5 lbs of cocoa in about 15-20 minutes. It has 5 different temperature profiles and just happens to work great on cocoa. I will be talking a lot more about this, but wanted to give everyone a first glimpse.

behmor.JPG

And of course, if you want to get into homemade chocolate and roasting your own coffee, it will be a perfect machine for that.

2 Comments

Comment

A few improvements and changes

Hi, welcome to the new and improved (I sincerely hope) site. A number of months ago, the service we use to manage Chocolate Alchemy site was hacked and became unusable to us. To make a long story short, we are now using Wordpress to handle a portion of the site. That means a number of things to you, my devoted customers and readers.

  • We now have a search feature (look in the right column, and down a little) and as I can get them in, all the old archives will be searchable.
  • Likewise, new announcements will be categorized for easier browsing.
  • I should be posting more updates, because now it is virtually effortless
  • If you wish to leave a comment or question, I will see it sooner as I am notified (but you will have to register - sorry about that, but comment spam is terrible).

As always, I have done my best to catch any errors before you do, but if you do see any broken links, please drop me a note or comment and I will get them fixed right away.

And now onto a little exciting news. We are now offering a selection (Madagascar, Dominican Republic, and Ocumare) of Roasted Cocoa Beans. The "catch" is that they are in larger quantities (10 lb minimum) to make it feasible.  If you want more than we offer (either in quantity [like a full 150 lb bag] or origin], drop me a note and I am sure we can work it out to get you the cocoa beans you want.

Finally, I have started to process of setting up a Wholesale shopping cart that will be clear and distinct from the current one.  Look for it a little after tax season.

So, what do you think?

Comment

Comment

Build your own Cocoa Roaster

OK, you "do it yourselfers". Being a chocolate alchemist sometimes means making your own equipment. Well, I am going to be building a new cocoa roaster for myself (actually for you, it is for your Kits) and I thought it might be nice for people to follow along and maybe build their own.

Now before you start thinking, no way, I can't do that just ask your self if you can use a few basic tools. Circular saw, jig saw, drill? If you can do that, then you can build the roaster I have planned. No fancy lathes, or heavy metal working tools. Just simple, efficient, cost effective construction.

So, if you have an interest, or just want to follow along, head over to the Forum, under the Roasting section in the Home Roaster thread.

Comment

6 Comments

Cocoa Bean Roasting

Now that I can actually take cocoa beans all the way to chocolate (with the discovery of the Santha Wet Grinder), I have started revisiting each stage and step in the chocolate making process. Sort of re-evaluating what I have learned, believed and talked about. In doing that I have started to examine how I roast cocoa beans. I have always noticed that the temperatures and times I suggest are hotter and often longer than those given by the "professionals" and I have wondered about that. One "range" that has consistently stuck in my head is from Frederick Schilling of Dagoba Chocolate. He roasts his beans 15-20 minutes at 220-250 F. When I do that, I have virtually raw beans. I have come to believe it is a matter of roaster heat capacity. When he (they) roast, the beans are agitated, they come up to temperature very quickly and hence, start roasting right away. When I tried this at home, I put the cocoa beans into a 250 F oven and it is almost 20 minutes before the beans even reach 200 F. No wonder they are under-roasted.

To try and emulate some of the delicate roasts I have seen out there, I decided to crack and winnow the cocoa beans before roasting and roast the nibs. The thought was that there would be more surface area, and each piece was smaller, so the whole roast could heat up faster. I cracked and winnowed two pounds of Carenero Superior, put them THINLY on a tray, and set them to roast at 250 F in my gas oven. Within a few minutes, the smell told me they were roasting very nicely. In 15 minutes I could tell I was almost done, and I pulled them out at 20 mins. Right on target!

Visually, they had not changed at all, but the aroma was this great dry biscuity cocoa smell and I could tell when I stirred them that they were much dryer (one of your roasting goals) and harder. All in all, a complete success. The cocoa bean nibs were completely roasted, not charred on the outside and raw on the inside (which can happen if you hit them with REALLY hot temperatures) but nice and even.

So, if you are a little intimidated by drum roasting, or some of the fancy whole bean temperature programs make you nervous, or your roasts are just not as chocolatey as you might like, give this a try. Crack and winnow your cocoa beans, spread them thinly on a tray, and roast them in the oven at 250-260 F for 15-20 minutes. You have to go by smell this way, but that is fine - they smell great when done.

I am trying a whole bean roast tonight, 250 F - 30-40 minutes. I will let you know how it comes out. Hopefully they start roasting in 15-20 minutes, and then roast 15-20 minutes. What I really want to see is if the roast is even and if the beans have a nice bright flavor (like the nib roasting above) or if the flavor is muted at all. Time will tell.

More later.

6 Comments

4 Comments

Cocoa Nibs Available - Necessity and Approachability

I have been wrestling with whether Chocolate Alchemy should start offering Cocoa nibs for sale. I am of two minds about it. I really want to convince you that it is not difficult to make your own chocolate, and that roasting is not that bad and come one, just jump in and do it. But on the other hand, I don't want to roast up pound after pound of beans just so you don't have to. It isn't that it is difficult and I really want you to have the control of your chocolate. But it is time consuming to set up the grill, in the pacific NW (north wet :-), and supply in a timely fashion, roasted nibs. It is just a different order of magnitude to roast enough for a batch of chocolate and roast enough to supply a business. So, I have come to a compromise. We are now going to offer unroasted cocoa nibs at no additional charge. This really goes to the heart of making chocolate at home approachable, without sacrificing service (I just could not keep up with demand), quality (fresh roasted is just so much better), and price (the cost of roasting is just not profitable, in the time sense). In addition, I think unroasted nibs may end up being a lot more easy to roast than the whole beans. I am going to start testing on this, but you should be able to roast them very effectively on top of the stove in a wok or large skillet, or with a heat gun in a bowl. Either way you should be able to see so much better how the roast is progressing and have immediate visual and aroma feedback about your roast.

So, if you want fresh unroasted cocoa nibs instead of whole beans, just say so in your order. There should be almost no extra delay as cracking and winnowing with the Cocoa Mill is very easy, and that I can keep up on. What you will get approximately 20-25% less in nibs than in whole beans. You wouldn't be losing any nibs, just husk. But you wouldn't be getting an extra "nibbing" fee. So for 2 lbs of cocoa beans, you will get about 1.5 lbs of cocoa nibs, more or less. There is going to be a little husk here a there. I am not perfect and they don't have to be either. Once you have roasted, the remaining husk will be much lighter and if you just use a blow drier like I outline the in Cracking and winnowing section, that bit of husk will blow right away. The worst case scenario is that the Champion Juicer's screen will catch it just fine.

Like I said, these will still need to be roasted, but I know it can be done on the stove top. I have roasted coffee that way, and this should be even easier . Sweet Maria's has a great mailing list for coffee roasting. Wok roasting and heat gun roasting are discussed there quite a bit (I am a member there) and any technique you use for roasting coffee can be applied to cocoa roasting. The temperatures are a bit lower for cocoa, but the techniques are the same. If you want to give one of these methods a try I would recommend practicing with something else first. From my own roasting experience, I would use sunflower seeds. They are about the same size as cocoa nibs and you can see very well if you are burning or scorching them. Once you can roast/toast them gently and evenly you are ready for cocoa nibs. In general, get a good heavy wok or skillet and put it on medium heat. Add your sunflower seeds (or nibs) and gently stir them. Don't rush them and get the heat too high, or you will just burn them. Adjust your heat a little up or down depending on how they are behaving. I would expect a pound to take 10-15 minutes. The seeds should end up a nice even burnished color. Cocoa nibs should be done when they have darkened a little (but not too much) and smell of baking brownies. If you ruin them, try again. Seeds are a lot cheaper than cocoa nibs. Finally, this is a lot more difficult to explain than to do. Practice with the seeds, ask me questions and finally, just give it a try.

4 Comments

3 Comments

Roasting Cocoa Beans

I have been experimenting with various roasting techniques and temperature profiles and I wanted to share some of the results with you.Some time ago you may remember I received a visit from fellow alchemist Frederick Shilling of Dagoba Chocolate. I had just finished making into liqueur a 3 lb batch of cocoa beans that I had roasted at 525 F for 15 minutes on my grill. We both tasted it a felt it was a bit over-roasted. He happens to really like barely roasted beans, where you have a lot of the sourness and acidity left. Dagoba roasts at about 250 F for 20-25 minutes. I on the other hand like my beans a bit more roasted. Just to be fair, I tried lowering the temperature of my next batch to see what I thought. Truthfully, I could not bring myself to drop the grill temperature to 250, but I did lower it to 350 F and roasted for about 23 minutes. It just didn't feel right. I never reach the point where any of the beans popped or cracked but they did crack and winnow just fine. Their final temperature was about 230F, right in the range of Frederick's cocoa beans and had the same sharpish flavor. This got me thinking. I roasted 100 degrees hotter but ended up at the same place. Why was that? Well, what I have come to conclude is that all the data out there about roasting cocoa beans is for hundreds if not thousands of pounds and that they are using huge roasters with large heat capacities. We here on the home front are limited in that respect, so what we lack in thermal mass we have to partly make up for in temperature and batch size control. So I tried a test. I heated my grill to 450 F. Cellulose burns at 451 F (remember Bradbury's Fahrenheit 451?) As soon as I put my drum in, the temperature dropped 100 degrees so I applied more heat and brought it quick back to 450, then lowered my heat input as the temperature came back up. The roast still took about 20 minutes. At that point the smell was chocolatey and I had a pop or two. The final temperature was about 280 F (for the bean mass, not the grill) and the resulting liqueur has no burned flavor at all, just good chocolate flavor. What does that mean for you at home? These are the conclusions I have come to:

  • 550 f really is to hot of an ambient temperature to roast in. Where as the beans were not burned, a burned flavor started to come through. I think the husk started to char just a little, or maybe just stuff on the grill. Keep your roasts 450 F or less.
  • Pick a target temperature for your beans.
    • 210-230 F for barely roasted
    • 250-260 for medium roast
    • 280-290 for full roast
    • 310 for very roasted (I will not say over-roasted, it is your chocolate and you get to decide)
  • Roast around 15-20 minutes for a test roast.
  • If you are at 450 F grill temperature and your roast is under-roasted, decrease your batch size
  • If it is over roasted, either roast more beans or decrease your initial grill temperature.
  • Once you hit a roast level you like, adjust your time to suit the flavor you want out of your beans. Overly long roast times will tend to mute flavors. Too short of a time may well be sour and/or uneven.

On my grill, I can roast 3 pounds to 260 F in 20 minutes. I like this profile quite a bit, although the flavors are just starting to mute a little. I may need to pull my batch size back half a pound so that I can shorten my overall roast time a little And finally, remember, each bean will be different. I roast them all before offering them and will try to give you an idea where I like them roasted. But in the long run, it is up to you to decide what you want your chocolate to be like. My suggestions are just that; my suggestions. They are not right or wrong. You are your own Chocolate Alchemist!

3 Comments

Cocoa Drum Roasting

3 Comments

Cocoa Drum Roasting

This is what my non-too-glamorous drum roasting setup looks like circa 2004. The drum very comfortably roasts 3 lbs and could probably do as much as 4 lb or as little as one. Basically, you just get your grill to a different starting temperature (note the dial thermometer inserted in).

3 Comments

Drum Roasting Cocoa Beans

Comment

Drum Roasting Cocoa Beans

A relatively dedicated group of home coffee roasters use drum roasters fitted onto a gas or wood fired grill to roast anywhere from one to five pounds of coffee at a time. Being one of the air roasting variety of coffee roaster, I decided I needed to come up with a drum roaster for cocoa beans and give it a try. Well I did just that. I took a perforated piece of light lead free sheet metal, rolled and riveted it into a cylinder and added a couple of endcaps of stove pipe to make a nice little 6" diameter, 12" drum. I mounted a rotisserie motor onto my grill (most have these mounts), drilled a square "hole" in each endcap to insert the rotisserie rod and placed a couple of locking collars on each side of the drum end to keep the whole thing in place and together. For my test run, I loaded the drum with two pounds of Carenero Superior, preheated the grill to about 550 F and started the whole thing rotating with the mounted motor. After about 5 minutes, it smell like brownies baking. Another few minutes and the cocoa beans started popping in what most coffee homeroasters would recognize as first crack. The cracks lasted a few minutes. I opened the grill, withdrew the drum on its rod, loosened one collar with a pair of pliers, and dumped the beans into a waiting bowl.

The previously slightly flat, dusty looking beans (remember, this is a luscious ugly duckling) were now plump, slightly shiny and a nice rich brown. After stirring and cooling a few minutes (while loading the next batch of beans in the drum), I cracked a few beans. They shelled effortlessly and tasted rich and sublime, with no hint of smokiness from the grill.

All told, I roasted up about 12 lb in an hour, about 15 minutes per batch, with three pound batches working very nicely. This is definitely the way to go for cocoa bean roasting in any quantity. Once I get a few more roasts under my belt, I will update the roasting section, along with some links where you can obtain drums and drum roasting information if you don't want to build your own.

Comment

Chocolate Alchemy Log - Testing in the Laboratory

Comment

Chocolate Alchemy Log - Testing in the Laboratory

I roasted 4 lbs (12 cups) of cocoa tonight. I really need to get my drum roaster finished. I think it will give a much better end product. This batch was done in the oven, distributed between two shallow dishes. I preheated to 425 F and put the beans in. 

Comment