
Roasting - Resolving Complexity - Part 3
It is good to see you again my friends. As always, there are seats in abundance, warm drinks by the fire and I have tales to tell. I also brought along a couple types of fresh baked bread and cheese I made. Please enjoy.
I know I’ve already given you quite a bit to think about but I hope I’ve not overwhelmed. I guess that is just kind of the nature of starting something new. You need to learn a bunch of new terms and concepts and it can be a bit much. Overall I hope it wasn’t too bad and you have the basics down. Let’s summarize:
Choosing a cocoa bean isn’t any harder than reading a review and picking one that sounds good.
You can’t have any water in chocolate.
You know that any recipe needs to have at least 35% of fat. The amounts of cocoa, sugar, cocoa butter and milk are pretty much to taste. Just go by what you can find in the store and be comfortable that if you drift outside that zone it’s no more than a happy little accident ala Bob Ross.
Believe it or not, we are both nearly done and also at the stage of chocolate making that is closest to my heart.
Roasting!
Before I dive down that rabbit hole I should absolutely mention the you don’t have have to roast your own beans. You need roasted beans or nibs but you can let me or someone like me do that job for you. You can buy roasted cocoa nibs and jump right to making chocolate.
Talk about making the complex simple.
Ok, back down the rabbit hole.
I love to roast.
Roasting is where the real alchemy starts. After fermentation, it’s the first stage where you actually have meaningful control over the flavor. Of all the topics I’ve written about, roasting has easily generated the most information — because it’s where your decisions matter most.
We roast cocoa for 4 reasons:
It removes the water
It makes it taste good
It loosens the husk from the nib
Just like a lot of foods, cocoa isn’t meant to be eaten raw. Aside from having too much water in it to make chocolate, the process of getting it from cocoa pod to dried and fermented bean has a number of stages that can introduce pathogens. Roasting makes it safe.
Even if you had super clean cocoa beans, ala sushi grade cocoa, the chocolate flavor isn’t there until you roast it.
Cocoa is roasted 15-25 minutes and gets 50-60 F hotter than boiling water so water is easily driven off.
As the cocoa dries, the outer husk gets dry and brittle and comes off more easily.
You can roast in either a home oven or some type of coffee drum roaster. Since I suspect most of you don’t have a coffee drum roaster we’ll focus with roasting in an oven.
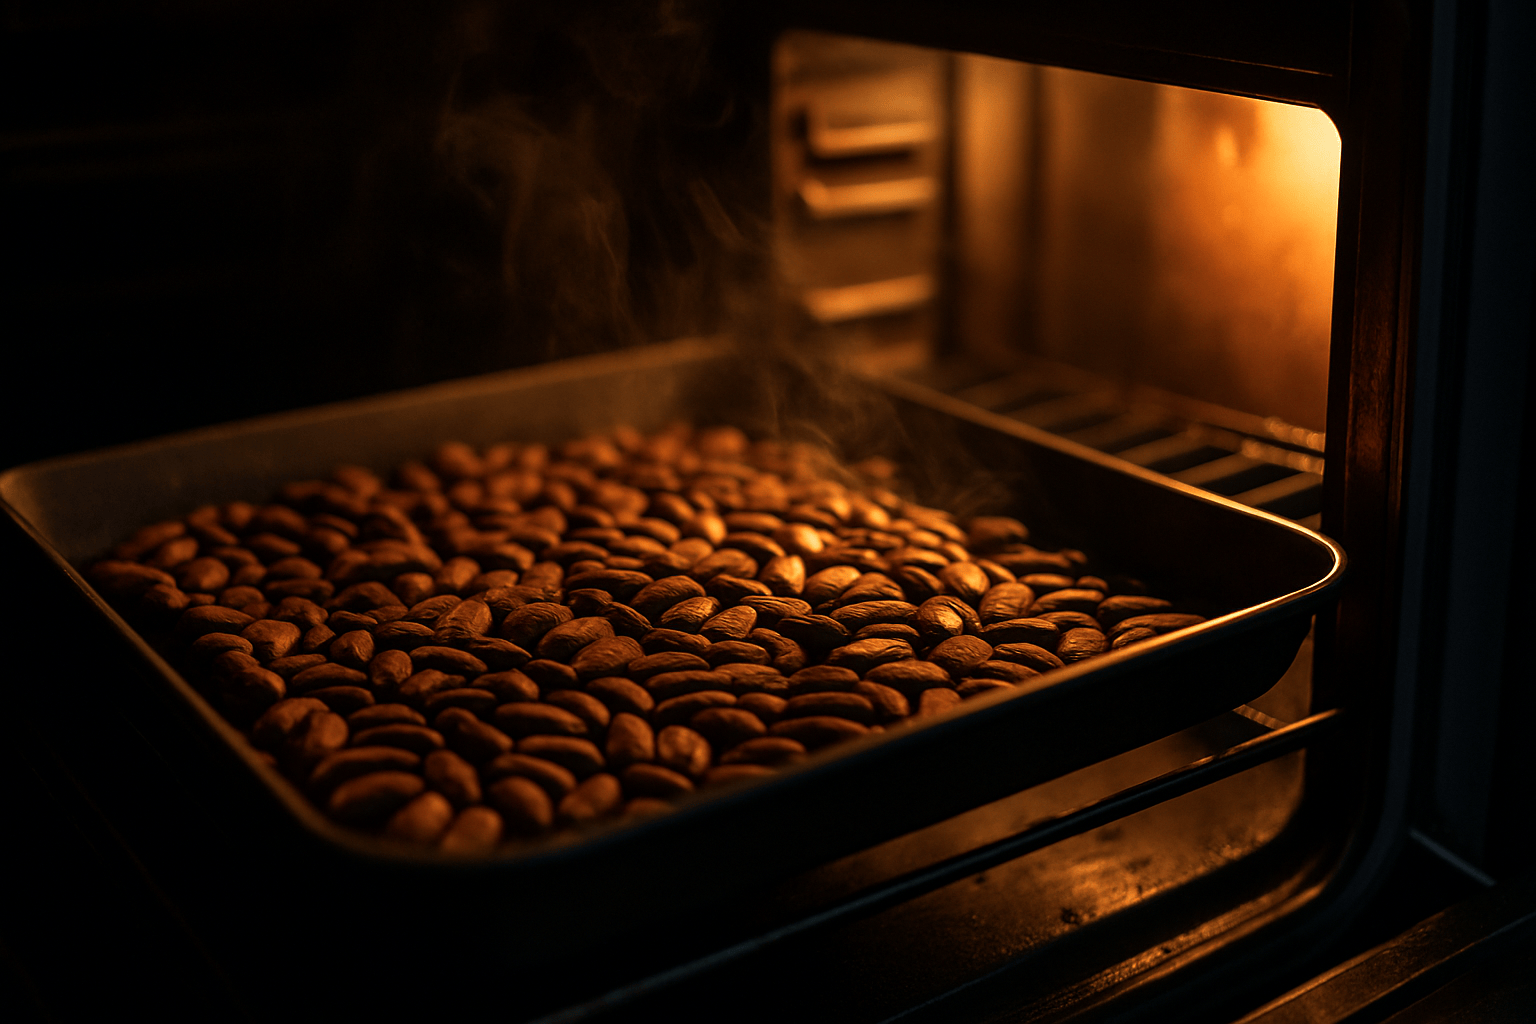
First off, roasting cocoa isn’t like baking bread or brownies. You won’t get the most out of your cocoa if you put the cocoa beans in the oven at 350 F and bake them for 30 minutes. It would be like boiling a really great piece of beef, like a fillet Mignon or a T-bone stead, for 3 hours . It’ll be cooked and safe to eat but there are so many better ways to make it taste good.
Fortunately there is a better way. You’ll need a baking tray, something to stir with and an infrared thermometer. Before you ask there is really no getting around needing an IR thermometer. Without it you’ll just be guessing how roasted the beans are and your chocolate will suffer for it.
Pre-heat the oven to 325 F and roast the beans in a single layer on a baking sheet until they are about 212 F, the boiling point of water. Stir the beans every 5 minutes. You will see the temperature may vary 10-15 F. You don’t want to pre-heat much above 325 F as it can cause a really inconsistent roast. Those temperature variations can be 20-30 F or more and that just isn’t good. Even with a convection oven. Anyway, you’ll need to slowly wave the laser pointer of the thermometer around the beans. You want the temperature in the range of 210-220 F. When you get there turn the oven down to 280 F and keep roasting until the beans are done, still stirring and taking temperature readings every 5 minutes.
There are two ways to know the beans are done. The absolute simplest way is to read my roasting recommendations for the bean you purchased. It’ll look something like 12:00/14:00/16:00 @ 255 F. That temperature is your goal. Don’t worry about the times for now. You just need to know I recommend 255 F for those beans and really anywhere in the 250 to 260 F range would be just fine.
The other way is to go by what you smell. Cocoa does best roasted until it is smelling a bit sharp. It is kind of hard to describe this. It is so much better to show you but alas we can’t do that right now. You’ll still need to pay attention to the temperature but if you are over 250 F then roast until they are smelling a bit acrid and there might be a tickle in your throat or nose. You aren’t burning them. They are just advertising they have been roasted enough.
Once the cocoa beans are roasted, take them out and cool them off. Set them in front of a fan, or dump them in a cool bowl. You are stopping the roasting process. Whether you cool them in 2 minutes or 20 minutes it is all the same. Don’t get complicated here.
Years ago some fellow coffee roasters and I over complicated roasting our own coffee and cooling the beans. We had long heard that faster was better so we devised ever more complicated ways to get those smoking beans down to room temperature FAST. We used pottery from the refrigerator. We popped cast iron pans into the deep freeze. At one point someone used liquid nitrogen to get a pound of beans to ambient (ok, well below ambient) in about 7 seconds. What we came to discover is that there can be too much of a good thing. Cooling the beans quickly worked to improve flavor...up to a point. After that the flavor got markedly worse. We theorized as to why but it really doesn’t matter. What matters is that if it isn’t broken, don’t fix it. Cooling your beans in 2 to 20 minutes is fine. A little shorter or longer is nothing but a happy little accident and nothing to worry about.
That’s it. That is all there is to simple roasting.
Pre-heat an oven to 325-350 F.
Stir 1-2 lb of beans every 5 minutes.
When the beans are 210-220 F turn the oven down to 280 F and roast until the temperature I tell you or until they smell sharp
Cool them.
If you are happy with that, good on you. If you want more, then top up your plates and cups. I want to tell you what more complex roasting might look like should you go there. I mostly want you to know another way exists.
Did anyone not notice there were two kinds of bread and cheese over there?
One of the breads is pretty simple. I used commercial yeast, all purpose flour with just a touch of whole wheat tossed in, and start to finish it probably took 3 hours. I baked it at 350 F for about 40 minutes. There is not a damn thing wrong with it. It is quite serviceable and pairs well with the fresh queso blanco cheese I whipped up yesterday.
The other bread has history and a bit of gravitas. It’s a sourdough I started 2 days ago, from a starter I’ve had going since before covid . It has 4 different flours in it (yep, just call me fancy Nanci) and I baked it in a scorching hot dutch oven, steaming it in the process, and then browning it to that lovely burnished color in a slightly cooler oven for another 40 minutes. It is certainly more complex to make but to my tastes pays off with a more complex flavor and texture. It pairs really nicely with the aged cheddar I made last spring and have been aging ever since.
You can roast cocoa as simply as I told you and you’ll get a very serviceable chocolate. You can also dive a bit deeper and the payoff can be a more complex and flavorful chocolate. Just like I needed a dutch oven for the fancy bread, plus some fancy pants temperatures and baking times, you are going to need some extra equipment and kind of rigorous temperature control to take roasting to the next level. But even so, it might sound like a lot, one might even say complex, but at the heart of it is pretty simple.
You have to roast in a drum roaster, very similar to how coffee is roasted. You’ll learn that the time and temperature relationship is called a roasting profile and there are three phases in a roasting profile. You’ll find out the drying phase doesn’t hardly affect the flavor of the beans, that the most important part is the Development phase and lasts 2-3 minutes, then you are coasting into the aptly named Finishing phase. Those are those times I told you about before that you didn’t need to worry about.
To my tastes, both for roasting and the flavor of the chocolate, the more complex path is more exciting. If you’re happy with quick bread and fresh cheese and chocolate from oven roasted beans then that’s what is important. If you hit a point you want to go deeper, learn more and find a way through the complexity I’d be honored to have you stand close by and I’ll do my best to show you the way.
Ok show of hands please. Who prefers the quicker bread and cheese? And the fussier ones? That’s cool, about an even split. I like that. It shows we aren’t all the same. Neither set is better or worse, just different. You keep that in mind with your chocolate making and you’ll do just fine. I’m done talking for now. Hell, I’m almost done telling you how to make chocolate. We’ll finish it up next time.
Ciao. And please, take the rest of the bread and cheese home.